The
first Apache's were built with Plywood decks. Some had lamination
issues due to inadequate resin. Second Sojourn is hull #20, built in
1968 and the previous owners report that it was one of them. In 1970,
it went back to Chris Craft and a new deck was installed. Pretty
amazing customer support This recall may have been motivated by a
famous photo in a late 60's book by Hal Roth. The photo shows an Apache
37 with a stove-in coachroof. It had not survived a grounding off San
Francisco with subsequent waves crashing on the deck. The newer Apache
decks
are foam core, and amazingly strong. The foam core construction
addressed the delamination problem and built a very waterproof deck. If
water should leak in through a fitting, the resin-impregnated foam will
not absorb it. Below is a photo of a core sample removed from the deck.
Beautiful construction.
Another
notable about Apache decks is that they are built of fiberglass
but with a wood-grain and caulking texture made to resemble a teak
deck. I understand that an actual teak deck was built and a mold was
made from
this wooden deck. The decks were painted teak brown with the caulking
painted black. The effect is pretty amazing, with even the teak bungs
visible in the surface. 35+ years later, most of these are now
faded. To restore them to original they could be repainted the same
dark tan and then the
'caulk' stripes painted black or a darker brown. I find even the
faded deck color to be a bit too dark. Darker decks absorb a lot of
solar
heat and are too hot to walk on barefoot on a hot day. My plan is
to repaint the deck with a lighter beige color with a bit of non-skid
added. I haven't gotten to this project yet.
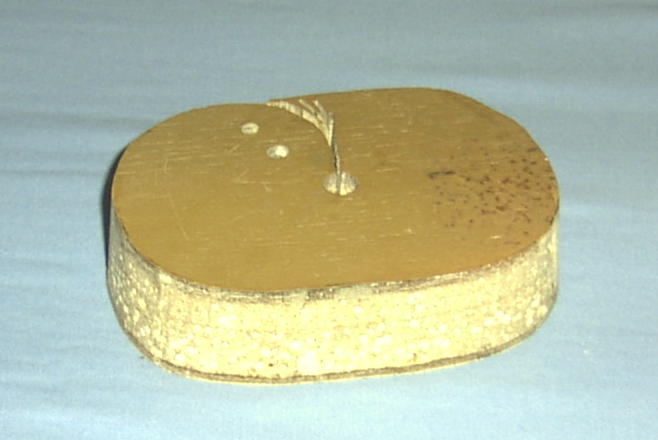
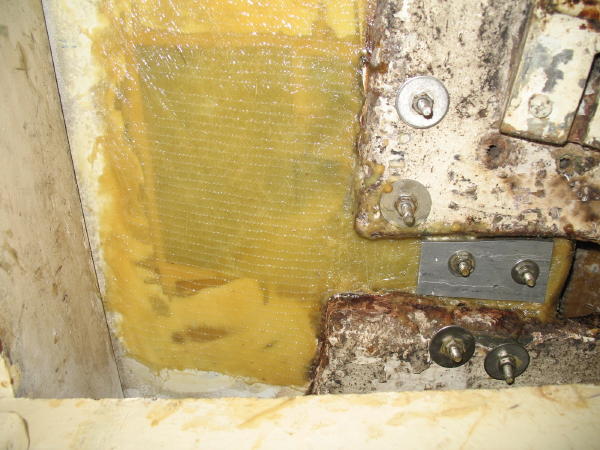
This
is a piece of forward deck that was removed to install a chain pipe. It
shows the quality construction of the Apache 37 foam core decks. 1" of
foam core, perfectly laminated to the deck and interior fiberglass
surfaces. Super strong, light and impervious to delamination by water
ingress. If this part of the deck had one of the steel plates, the
plate would be 1/4" thick and located close to the bottom
interior fiberglass.
Apache decks were built with backing plates embedded in the deck for deck hardware These plates are 1/4" cold rolled steel plates as are embedded into the fiberglass decks under the cleats, stanchions, etc. My original survey showed up a few minor spots of bulging below the deck and two spots in the forepeak where the deck had cracked open below the bow pulpit bases and showed rust spots. During spring '96, I decided to have a closer look. I climbed into the anchor locker, and began to open up the places at the bow pulpit with a wood chisel. The plates went across the deck from side of the bow pulpit base to the other. The plates were very rusty with chunks falling off. I eventually found the sides of the plates and chiseled the fiberglass away until the forward plate was completely exposed. With the longer aft one, I cut back the fiberglass until clean metal (about 10"). Then cut off the rusted part with a Makita 4" grinder with a cut-off wheel.
I considered the options of what to replace the plate with. Either fiberglass, foam, 1/4" G10, or stainless steel would work fine. I had two new plates fabricated in stainless using the old ones as patterns. Then I reglassed them in: mat between the plates and the deck, one layer of mat and one of cloth to cover the plates. Doing fiberglassing upside down is normally a messy proposition, but this job went smoothly. I repainted below the deck where the work was done and the result is strong and attractive. If I had it to do again, I would use foam instead of stainless and then mount an aluminum backing plate below the deck.
I used SS screws and nuts in the stanchion holes to hold up the plates and hold it all together while the fiberglass hardened. The screws were a bear to remove, and during removal they were ruined. Next time I'll use cheaper steel hex head screws and wax them first to make release easier. Or maybe nylon screws which can more easily be drilled out. Better still, support the plate from below by wedging thin sticks to other parts of the boat. Also, next time I'll use a magnet first to locate the edges of the plates and then carefully remove the fiberglass below so I can re-use the fiberglass piece. My work was in the not-so-visible anchor locker.
I
found that most major deck
fittings (stanchion bases, cleats and inboard jib track) also use steel
plates. Two other places are delaminated. The rest (about 20 of them )
are OK for now. The
moral of this story is that sealing all deck hardware is really
important as a preventative measure
on the Apache.
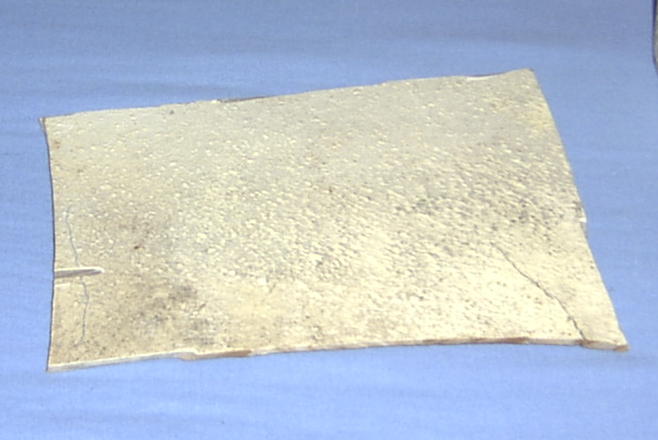
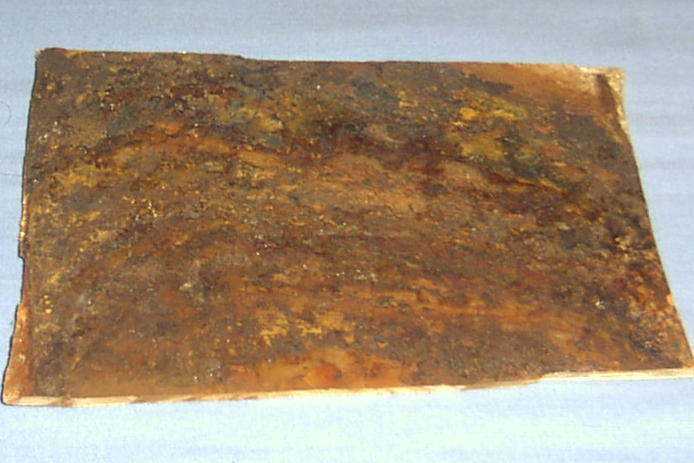
This
piece of the interior below deck fiberglass surface was removed to in
order to remove a steel deck plate. It was bulged and cracked where the
steel plate had rusted and expanded.
n
the 13 years I have owned Second Sojourn there developed a deck bulge
at the
stanchion base near the starboard upper shroud. The deck was bulged up
about 3/16" and cracked below decks. I verified with a magnet
that
one of the steel backing plates was causing the bulge. I wanted to fix
it when I had the time, but the time was not to be. Also this plate is
partially obscured below deck by the upper shroud chainplate mount, a
thick fiberglass right-angle bracket that ties the hull to the deck for
the chainplate support. A critical area since the upper chainplates
hold up the mast so I was a bit nervous about possibly weakening the
deck in that area.
These steel plates are one weakness of the Chris Craft design. They are
carbon steel embedded in the deck as backing plates for deck hardware
such as stanchion bases, cleats and the inboard genoa track. If they
get wet due to leaks, they can rust and if they rust enough, they can
either bulge the upper or lower part of the deck, crack the fiberglass,
and weep rust. When I
bought Second Sojourn I replaced the two large plates forward that
support the bow pulpit. It was a pretty big job but the repair has held
up fine.
My posting earlier this year on the Chris Craft
Sailboat Yahoo! web group to request advice returned George
Wigfall's response.
George did an extensive refit to his Apache were he actually removed
all the plates from his deck from above. From
above the work to remove the plate and replace it is a bit easier, but
then the deck must be finished to match, and this is a pretty big job.
When removing a plate from below you work over your head which is
difficult. But the fiberglass skin below is thin and easily removable,
(although not necessarily accessible) and the repair is structural
only, no fiberglass finishing required. Most below-deck places are
pretty well hidden.
'07 was the spring to replace my problem plate. I chose to replace it
from below, knowing that I would have to cut it into pieces to get it
out. When steel rusts, it expands in volume. Since the steel plate is
completely enclosed, it expands the deck. That was causing the bulge.
The plate had to go. It was bulging up the deck above and bulging and
cracking he fiberglass layer below a bit It was partially
obscured below deck by the original chainplate support. After
considering both approaches, I chose to remove it from below. The
steel plates are all buried 1/2" below the deck surface but are only
1/8" above the thin lower layer of fiberglass. Years ago I
replaced the two bow pulpit backing plates from below using a similar
technique. I had reasonable access from below while sitting in the
hanging locker, and the mess would be somewhat contained by the
lockers.
Also I wasn't looking forward to repairing all that deck top fiberglass
with the lines cut in. I know George did all his plates this way and
was happy with it, but my finish fiberglass technique is not so great.
From below the repair would be well hidden in the ceiling of the
locker. I
worked while sitting in the hanging locker and the job took several
hours spread out over a few days.
Step 1 was to locate the edges
of the plate with a magnet and mark it with a pencil. The plates are
each a bit unique but generally they are about 18" x 6" and go all the
way from the outboard bulwark to near the cabin top. I removed a 6" x
6" piece of glass from below to access the center of the plate and the
3" strip from between the 2 chainplate mounts. I made 2 cuts in the
steel plate to remove the center part of it. The inboard part of it was
still intact and not rusty at all, and to remove it I would have
had to remove the shelf above the hanging locker. So I left that part
in place. By removing the center part and leaving 1" protruding
as a way to grab onto it, was able to get the outboard 6" plate removed
by sliding it inboard with some effort.
Step 2 was to unbolt the
stanchion base and loosen the upper shroud turnbuckle to remove any
compression of the deck. These bolts were so stuck with a 5200-like
caulk that I had to drill off 3 bolt heads and pound them down with a
hammer and a sacrificial phillips screwdriver. I was worried that some
of this tough goo might be gluing the plate in place so I drilled the
1/4" bolt holes oversize to 5/16", with a plan to go larger if needed.
Step 3 was to loosen the
outboard end of the plate which was stuck in there good. This took 2
hours of hammering, prying the deck up, prying and wiggling the plate
down and the chainplate mount down. The hammering freed up some of the
loose rust pieces. I drilled a couple of additional 5/16" holes
in the plate from below to allow a large modified screwdriver to pry
the plate sideways. Eventually it moved 1/4". In another hour it moved
1" and then finally came out. I cleaned out the slot with a thin wire
brush, and then with sandpaper glued to a stick of plywood.
Step 4 was to refill the void.
I used marine structural foam, the modern equivalent of what the
original deck was made of. I made a few 3/8" thick pieces and replaced
the plate with a three piece puzzle of foam. They were put in place
with West epoxy thickened with high density filler. I then injected a
bunch more thickened epoxy in the old stanchion holes to fill any voids
on the top of the foam. The few cracks around the foam below were
filled with heavily thickened epoxy just so the glass would lay flat.
Step 5 was to compress the deck
a bit in order to pull the bulge down and to fill any voids in my epoxy
repair. I placed two 1/4" flat head bolts right through the deck and
the chainplate support to pull the construction together and
squeeze down the still bulging deck. I countersunk the 2 bolts into the
deck, epoxied over the heads in the deck, and plan to leave them there
forever. They were tightened down until most of the bulge was gone and
the epoxy began to squeeze out.
Step 6 was to glass over the
bottom. I use a great material called "biaxial stitch mat"
consisting of two 45 degree biaxial glass layers stitched to a thin
layer of mat. This stuff is my fiberglassing secret weapon. It is
exceedingly strong and one layer is 1/16" thick finished. It only took
one layer to cover the foam. Just 5 layers of this stuff were used to
glass in the engine mounts for my 40HP Yanmar. I have a roll of it left
over from the engine job if anyone needs some pieces.
Step 7 was to re-mount the
stanchion about 4" forward of the original spot. The two forward holes
would go right through the forward shroud chainplate mount (super
strong) with just big washers, and the 2 aft holes would go through the
new foam construction with a 1/4" aluminum 1.5" x 3 1/2" backing plate.
Step 8 is to finish below by
painting and fair and refinish the top deck. This step has not been
completed yet.
Cutting the steel plate in two places from below, with an abrasive
cut-off discs is no fun. I used full protection of my face, hands,
head, hearing, etc. The trusty Makita 4" grinder, a handful of abrasive
discs and perseverance finally won.
I realized when I was banging away below with a hammer how solid and
substantial the deck and chainplate areas are on that part of the boat.
I'm still not 100% happy with deck-mounted upper shroud chainplates,
but I now understand why they have held up (the mast) on so any boats
for all these years. George replaced his upper chainplates with long
vertical plates glassed to the hull. I agree with this approach, but
the existing ones seem to work fine. Someday....
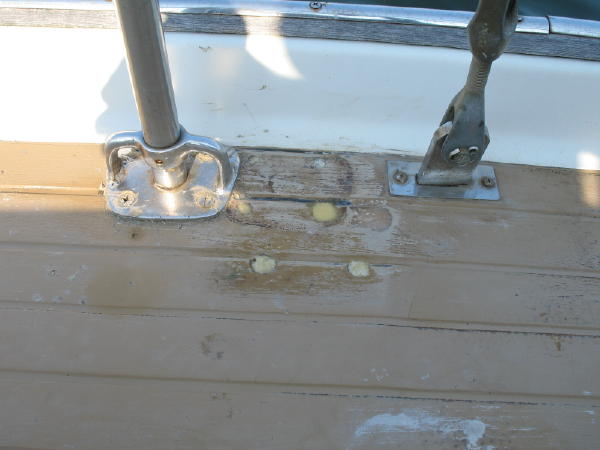
Here
is the repair from the top. The stanchion has been moved forward from
the shroud and the original holes plugged. Note the other two holes for
the 1/4" flat head bolts I embedded in the deck to hold the repair
together and to reduce the bulge. The bulge is 90% gone.
This
is the repair from below, before painting. Note the two 1/4" bolts
embedded in the deck (with large washers) and the new 1/4" aluminum
backing plate for two of the stanchion bolts. The other 2 stanchion
bolts go through the very strong chainplate mount and so only needed
washers.
I
hope the port side deck plate doesn't give me the same trouble. Its
accessibility is worse due to the cabinets behind the head. I would
probably replace the port side one from above.
Many thanks to George for his help and inspiration.
The Apache keel is an interesting design: The hull has traditional lines that bring to mind a full keel, but the keel is actually an aggressive (for 1968) bulbed, iron fin keel. There are not many boats made like this. This reduces wetted surface versus a full keel and as a result, the steering is more responsive than a full keel boat and the light air performance is outstanding.
The
keel has a wide flange
at the top and 14 large flat head bolts are used to attach it to the
hull. This keel mounting is extremely strong. One of the 3/4"
x 4" flat head bolts has the strength to support the 6500# keel. This
design could only be done in iron: a lead flange
would not have adequate strength in its flange. The
joint between the keel and hull must be faired with an elastic
material. When I bought her, the caulking was loose in places. I
removed the caulk, cleaned the groove out and applied epoxy primer
(barrier coat). I applied a hard filler, but this was a bad idea.
Within
a year it had cracked. So learning my lesson the hard way, I
ground out the hard filler (Makita grinder) and applied a softer
caulking, Life Caulk, which worked very well.