2021-2023 Repairs:
Apache 37 Rudder, Anchor Windlass, Cabin Top
Fuel Polishing
and Diesel Tank Cleaning
Rudder Repair
In 2021 my buddy Dave and
I were sailing to Maine, when he noticed that there was a tiny bit
of play in the tiller. The rudder and tiller have always been
super tight. Now it had maybe 1/4" to 1/2" of motion at the end of
the 3' tiller, certainly not much. I checked the tiller, tiller
hinge, and top rudder bearing and they were all fine. But on
a 53 year-old rudder, play in the rudder itself could be bad. I
didn't know exactly how the rudder was constructed internally, but
I suspected stainless plates, welded to the rudder stock (shaft).
Then surrounded by wood. Is the wood badly rotten? Worse, if there
are lets say 3 plates welded to the shaft, maybe 2 of the welded
plates had broken loose? Time to investigate.
First step: Where is the
play?
There is less than 1/8" of
the rudder shaft visible above the rudder when it is mounted to
the boat. I wanted to get a large pliers on the shaft. I dropped
the rudder about 3/4", enough to get a vise-grip on the shaft, and
sure enough, the play was between the shaft and the rudder. Not
good.
Second: Remove rudder and
bring it home. Easy enough. I removed the rudder in the fall so I
could troubleshoot it properly over the winter.
Third: I got a small metal
detector. The metal detector showed thin metal parts fore-and-aft,
about 1/4 and 1/2 way from the top. It showed one larger
metal area near the bottom. I drilled 1/4" holes. The 'rods' were
about 1/2" wide, in the center of the rudder (about 1" deep) and
the plate was very close to the surface. It was close to the
surface on both sides. Strange, definitely not conventional rudder
construction. The core is solid mahogany. The wood was in good
condition. A bit of moisture, but all solid.
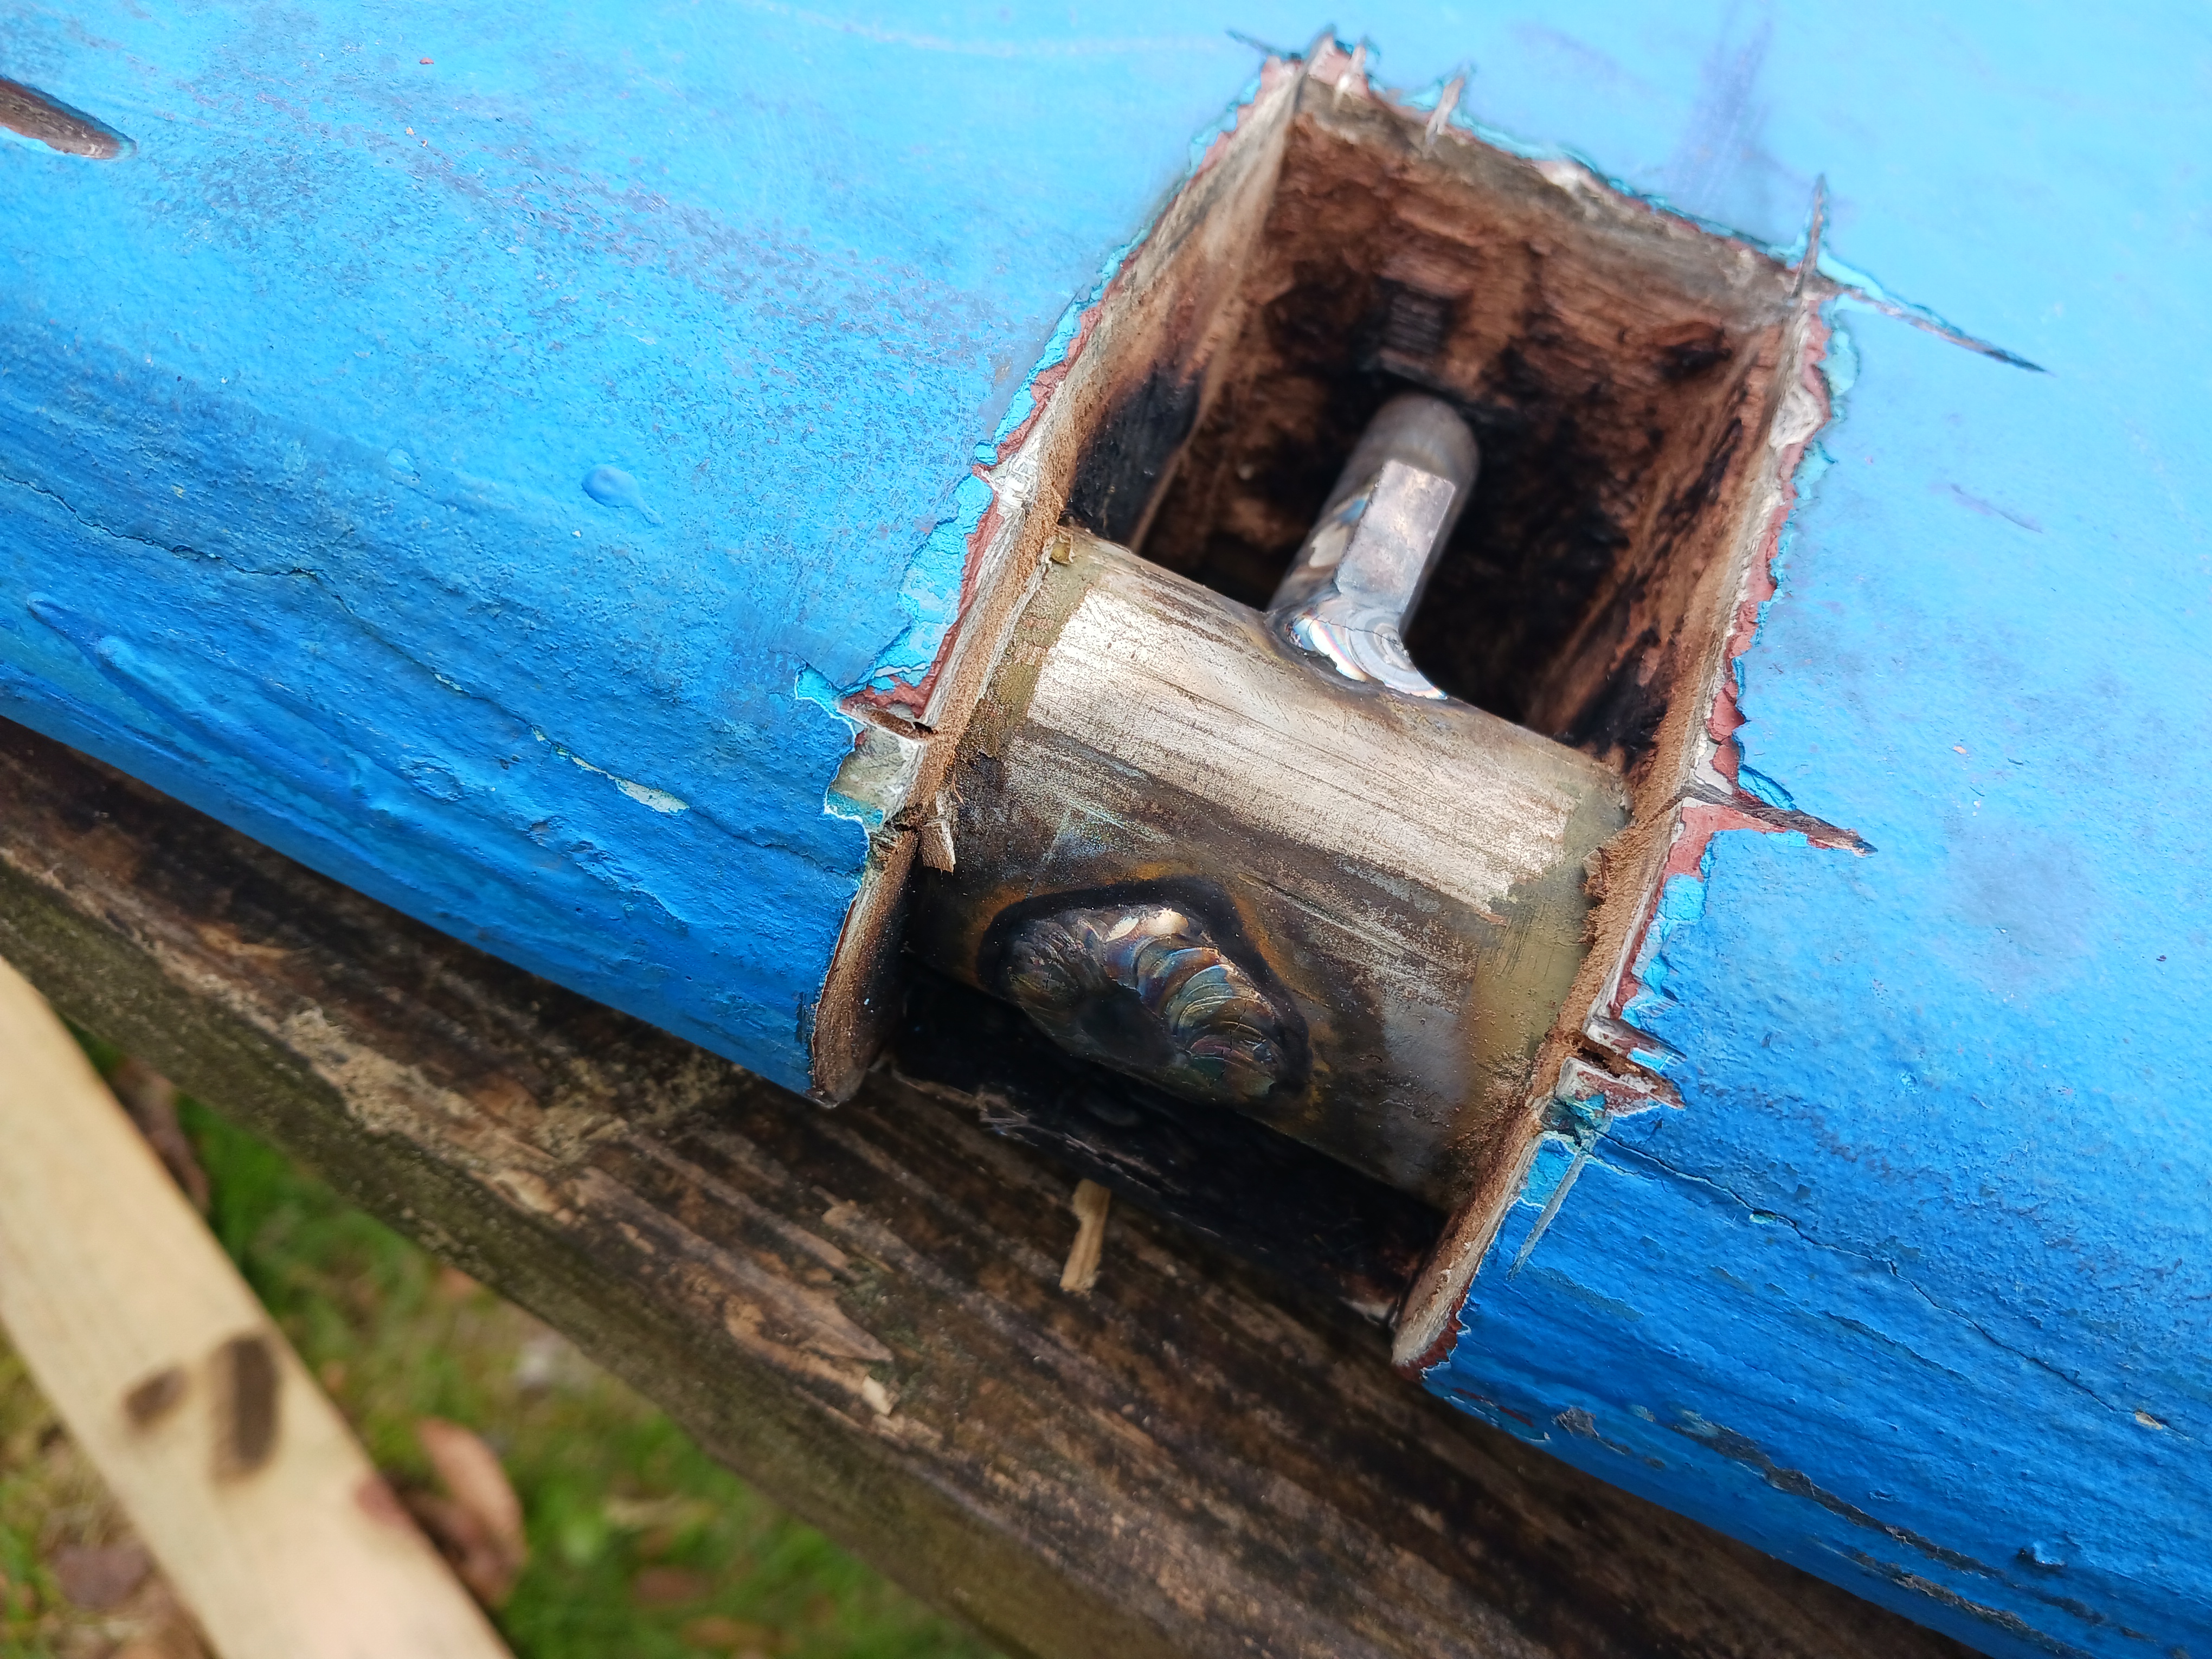
With a grinder, a chisel,
and reciprocating tool I opened up the areas around the joints
between the shaft and the rods, and between the shaft and the
plate.
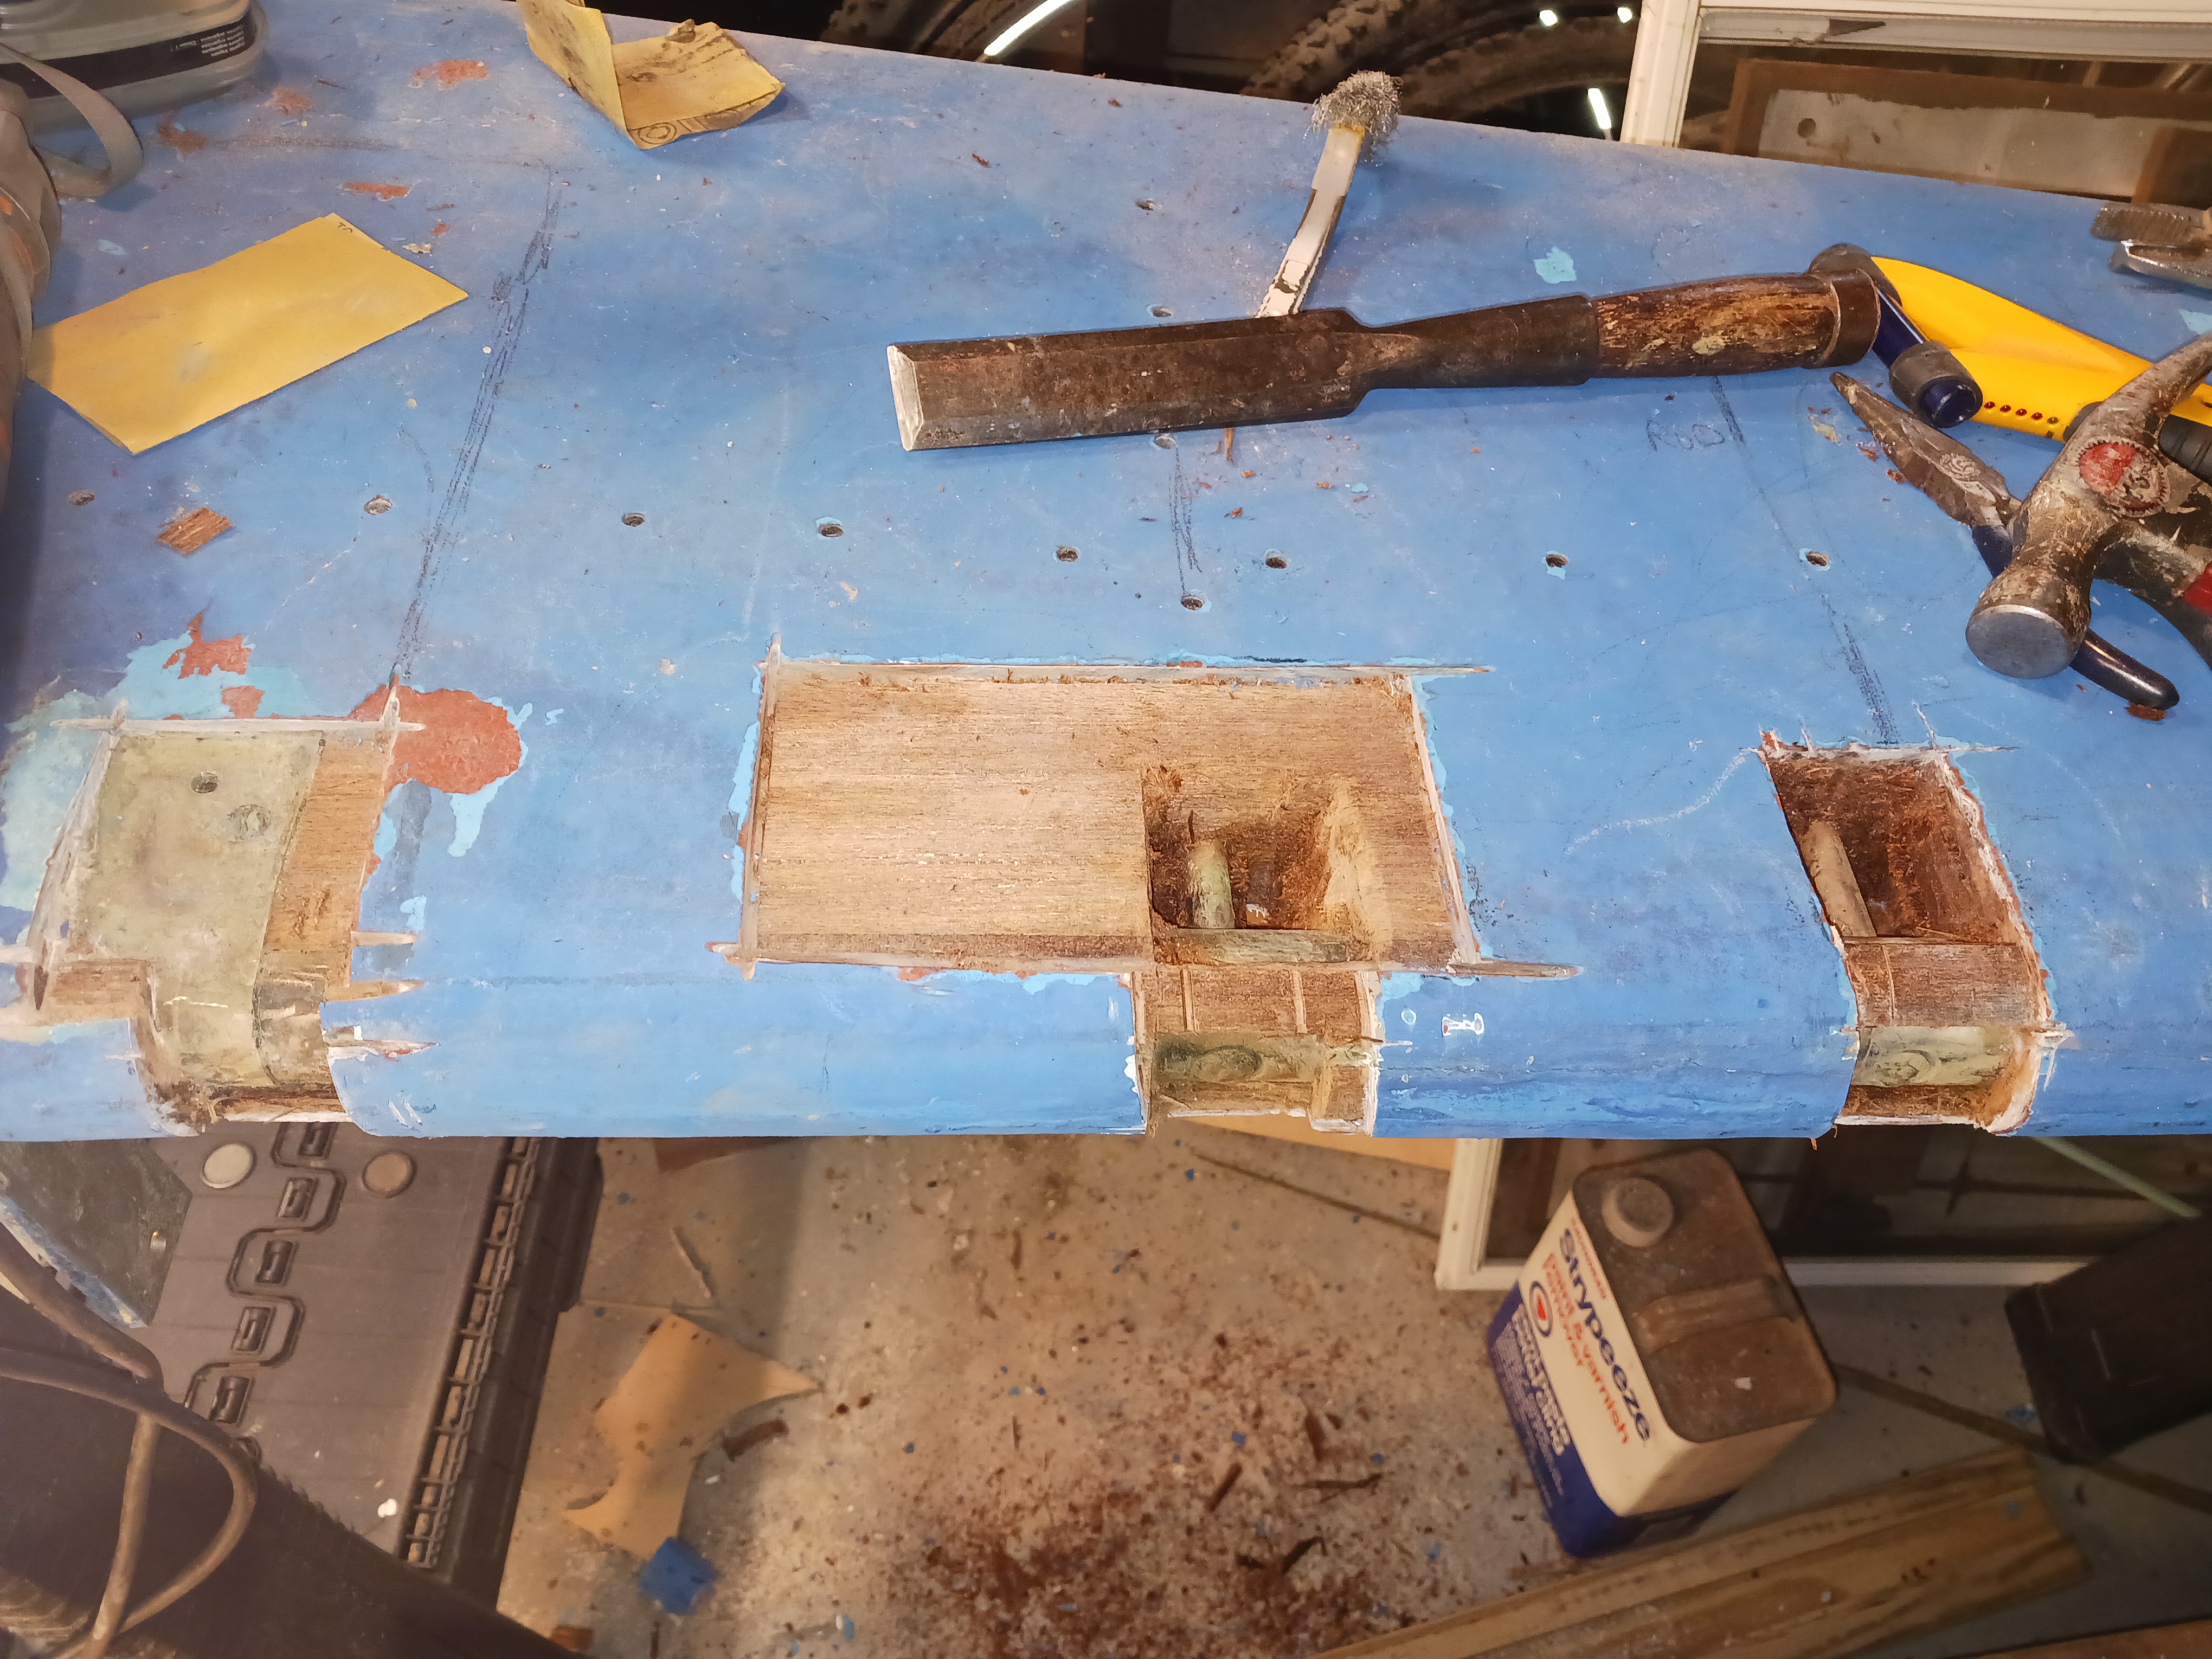
The rods are 3/8"
and go through holes in the 1.5" shaft. The ends of the rods are
peened over to keep them from moving. The bottom plate is maybe
3/16: stainless or Monel, and is bent (wrapped) around the the
shaft. All of these had a bit of play. Apparently the rods or
holes in the shaft have worn and loosened up a bit over 53 years
of sailing.
The good news is that the
play probably wouldn't get too much worse and should not fail
catastrophically. The bad news is that it will gradually get a bit
worse over time, and all the rudder torque depends on these 2
rods. The shaft is constantly moving in the rudder, making it
almost impossible to keep water out of where the shaft enters the
rudder, top and bottom. This could help explain some of the winter
cracking that I have experienced the past 7 or so years. After
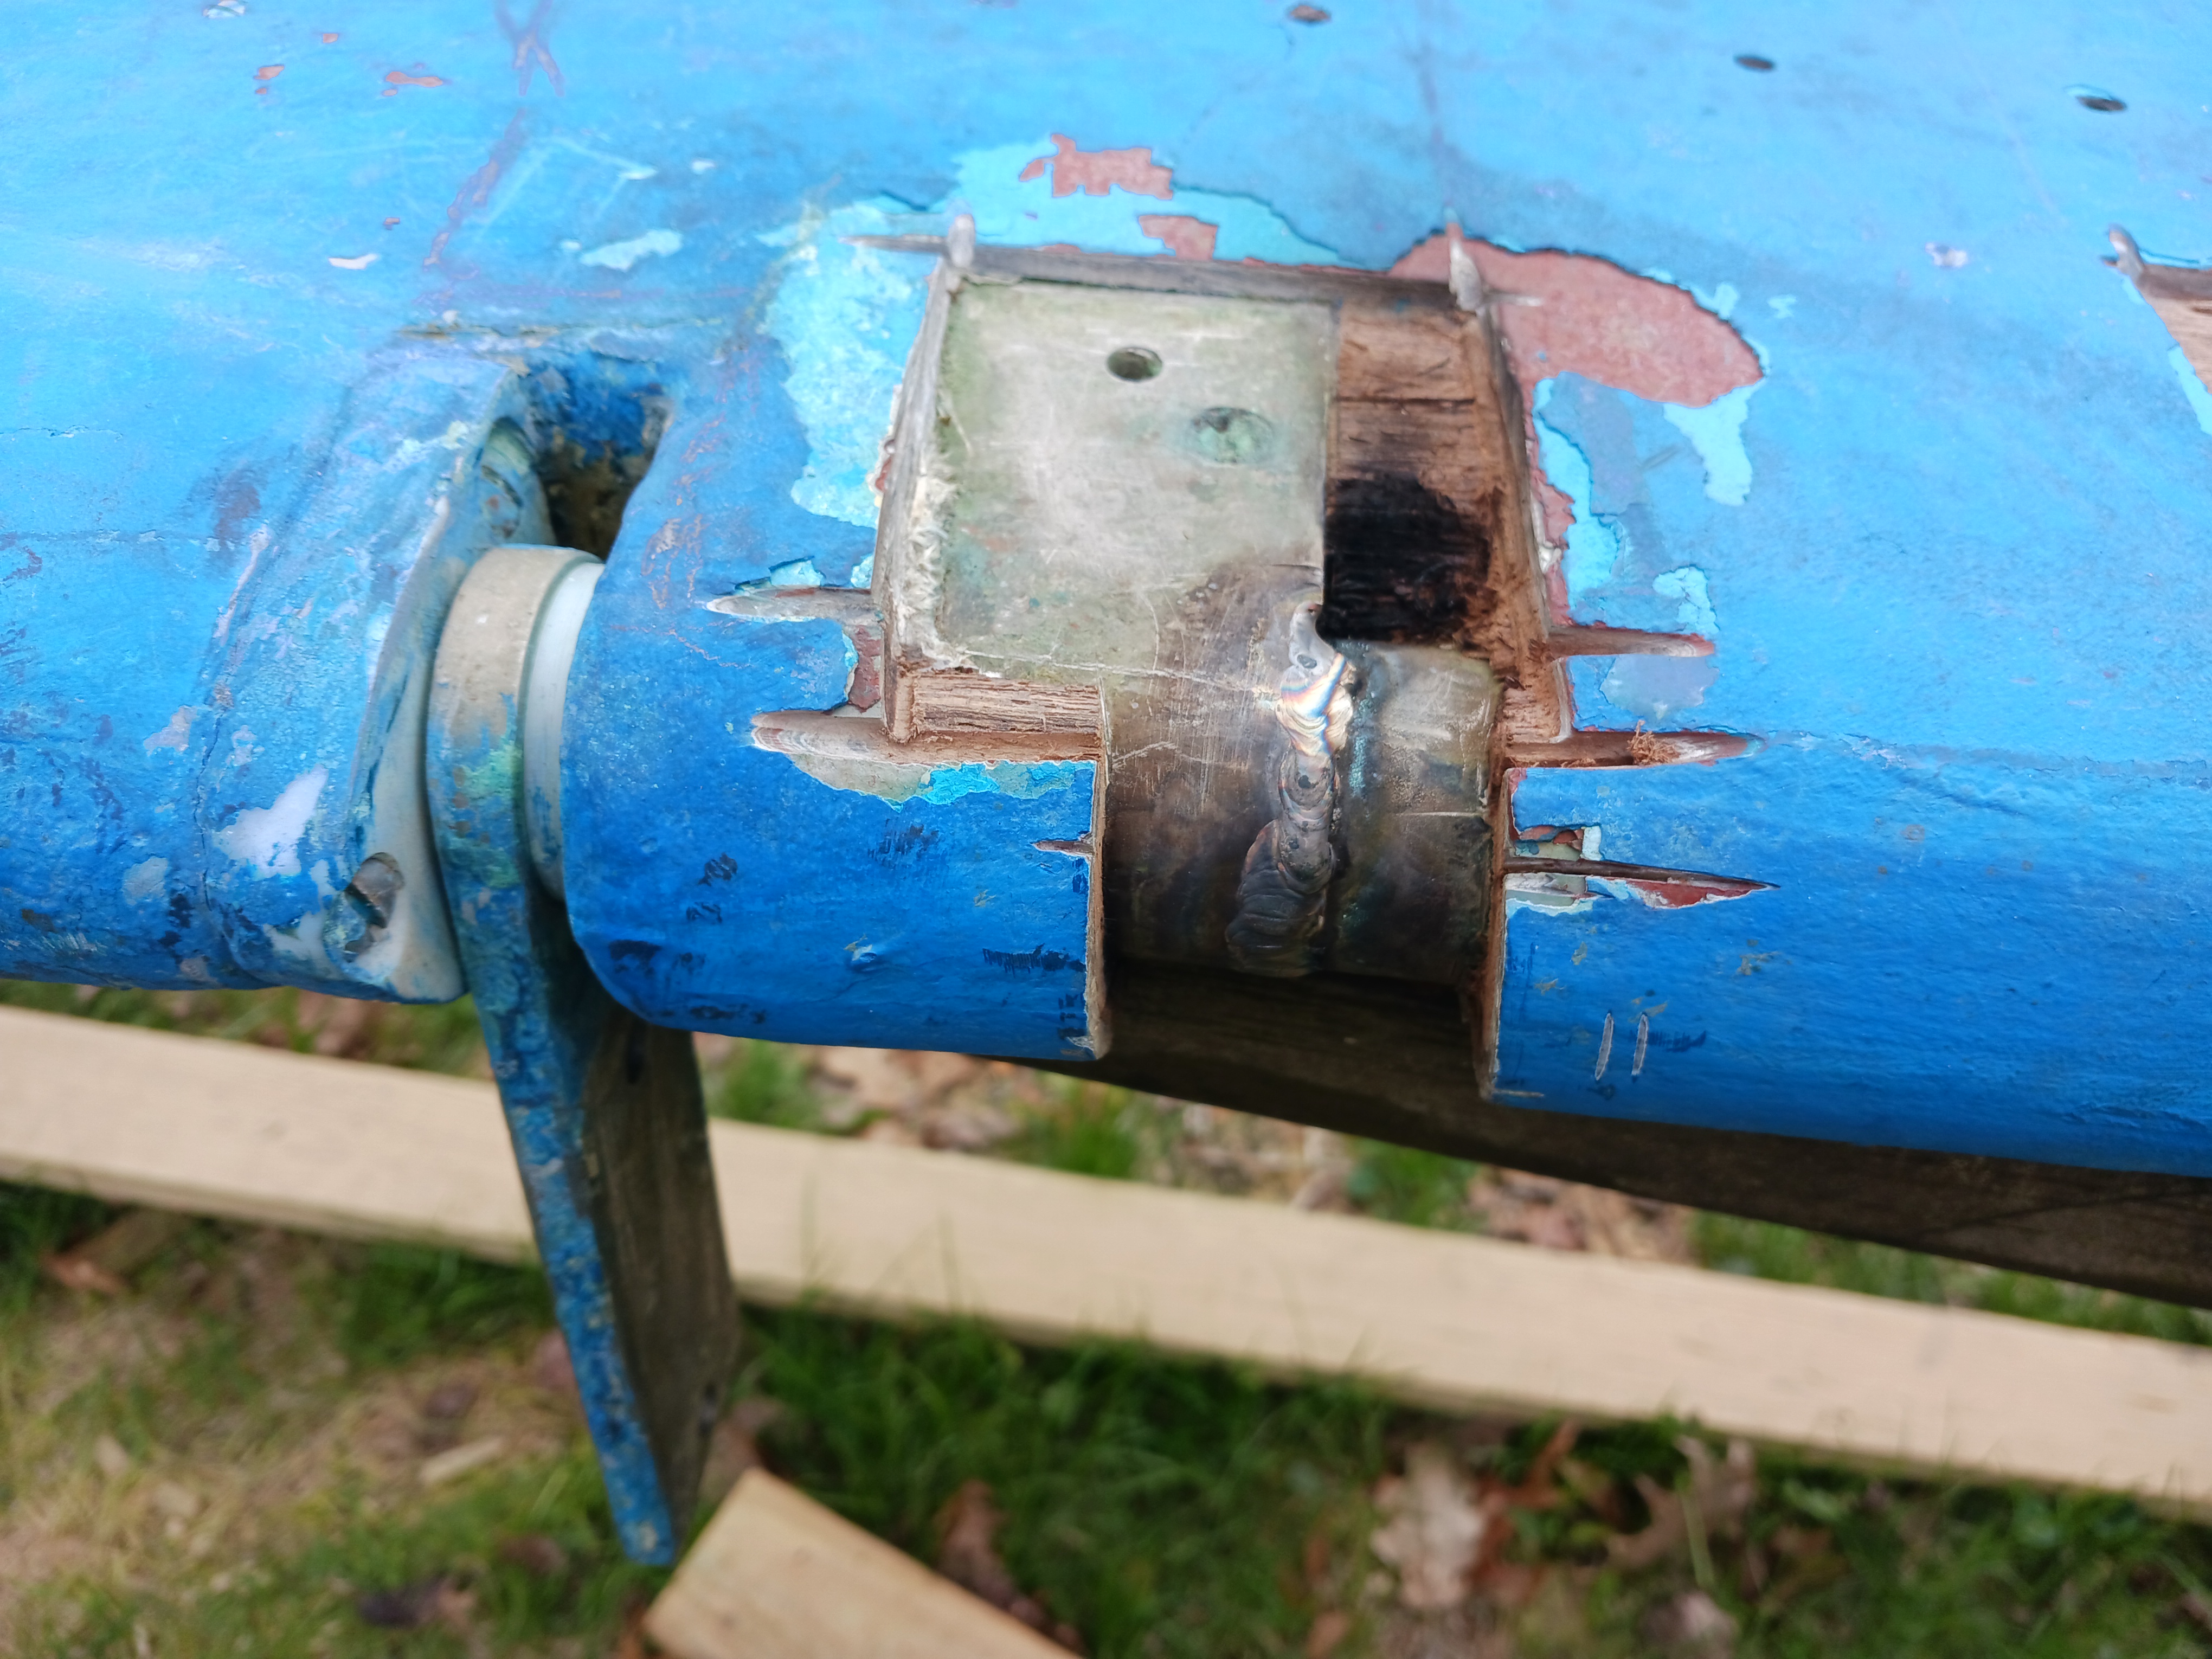
thinking about it for a while, I decided to have the rods and
plate welded to the shaft, and to add some small stainless gussets
welded on to strengthen the joints on both sides. This worked very
well. My thanks to Lawton welding in Topsfield, MA. They do
stainless welding very well.
Here is the process of glassing up the holes. I filled the larger
voids with chunks of foam core, ground the area down, then added
2-3 layers of biaxial stitch mat (1708).
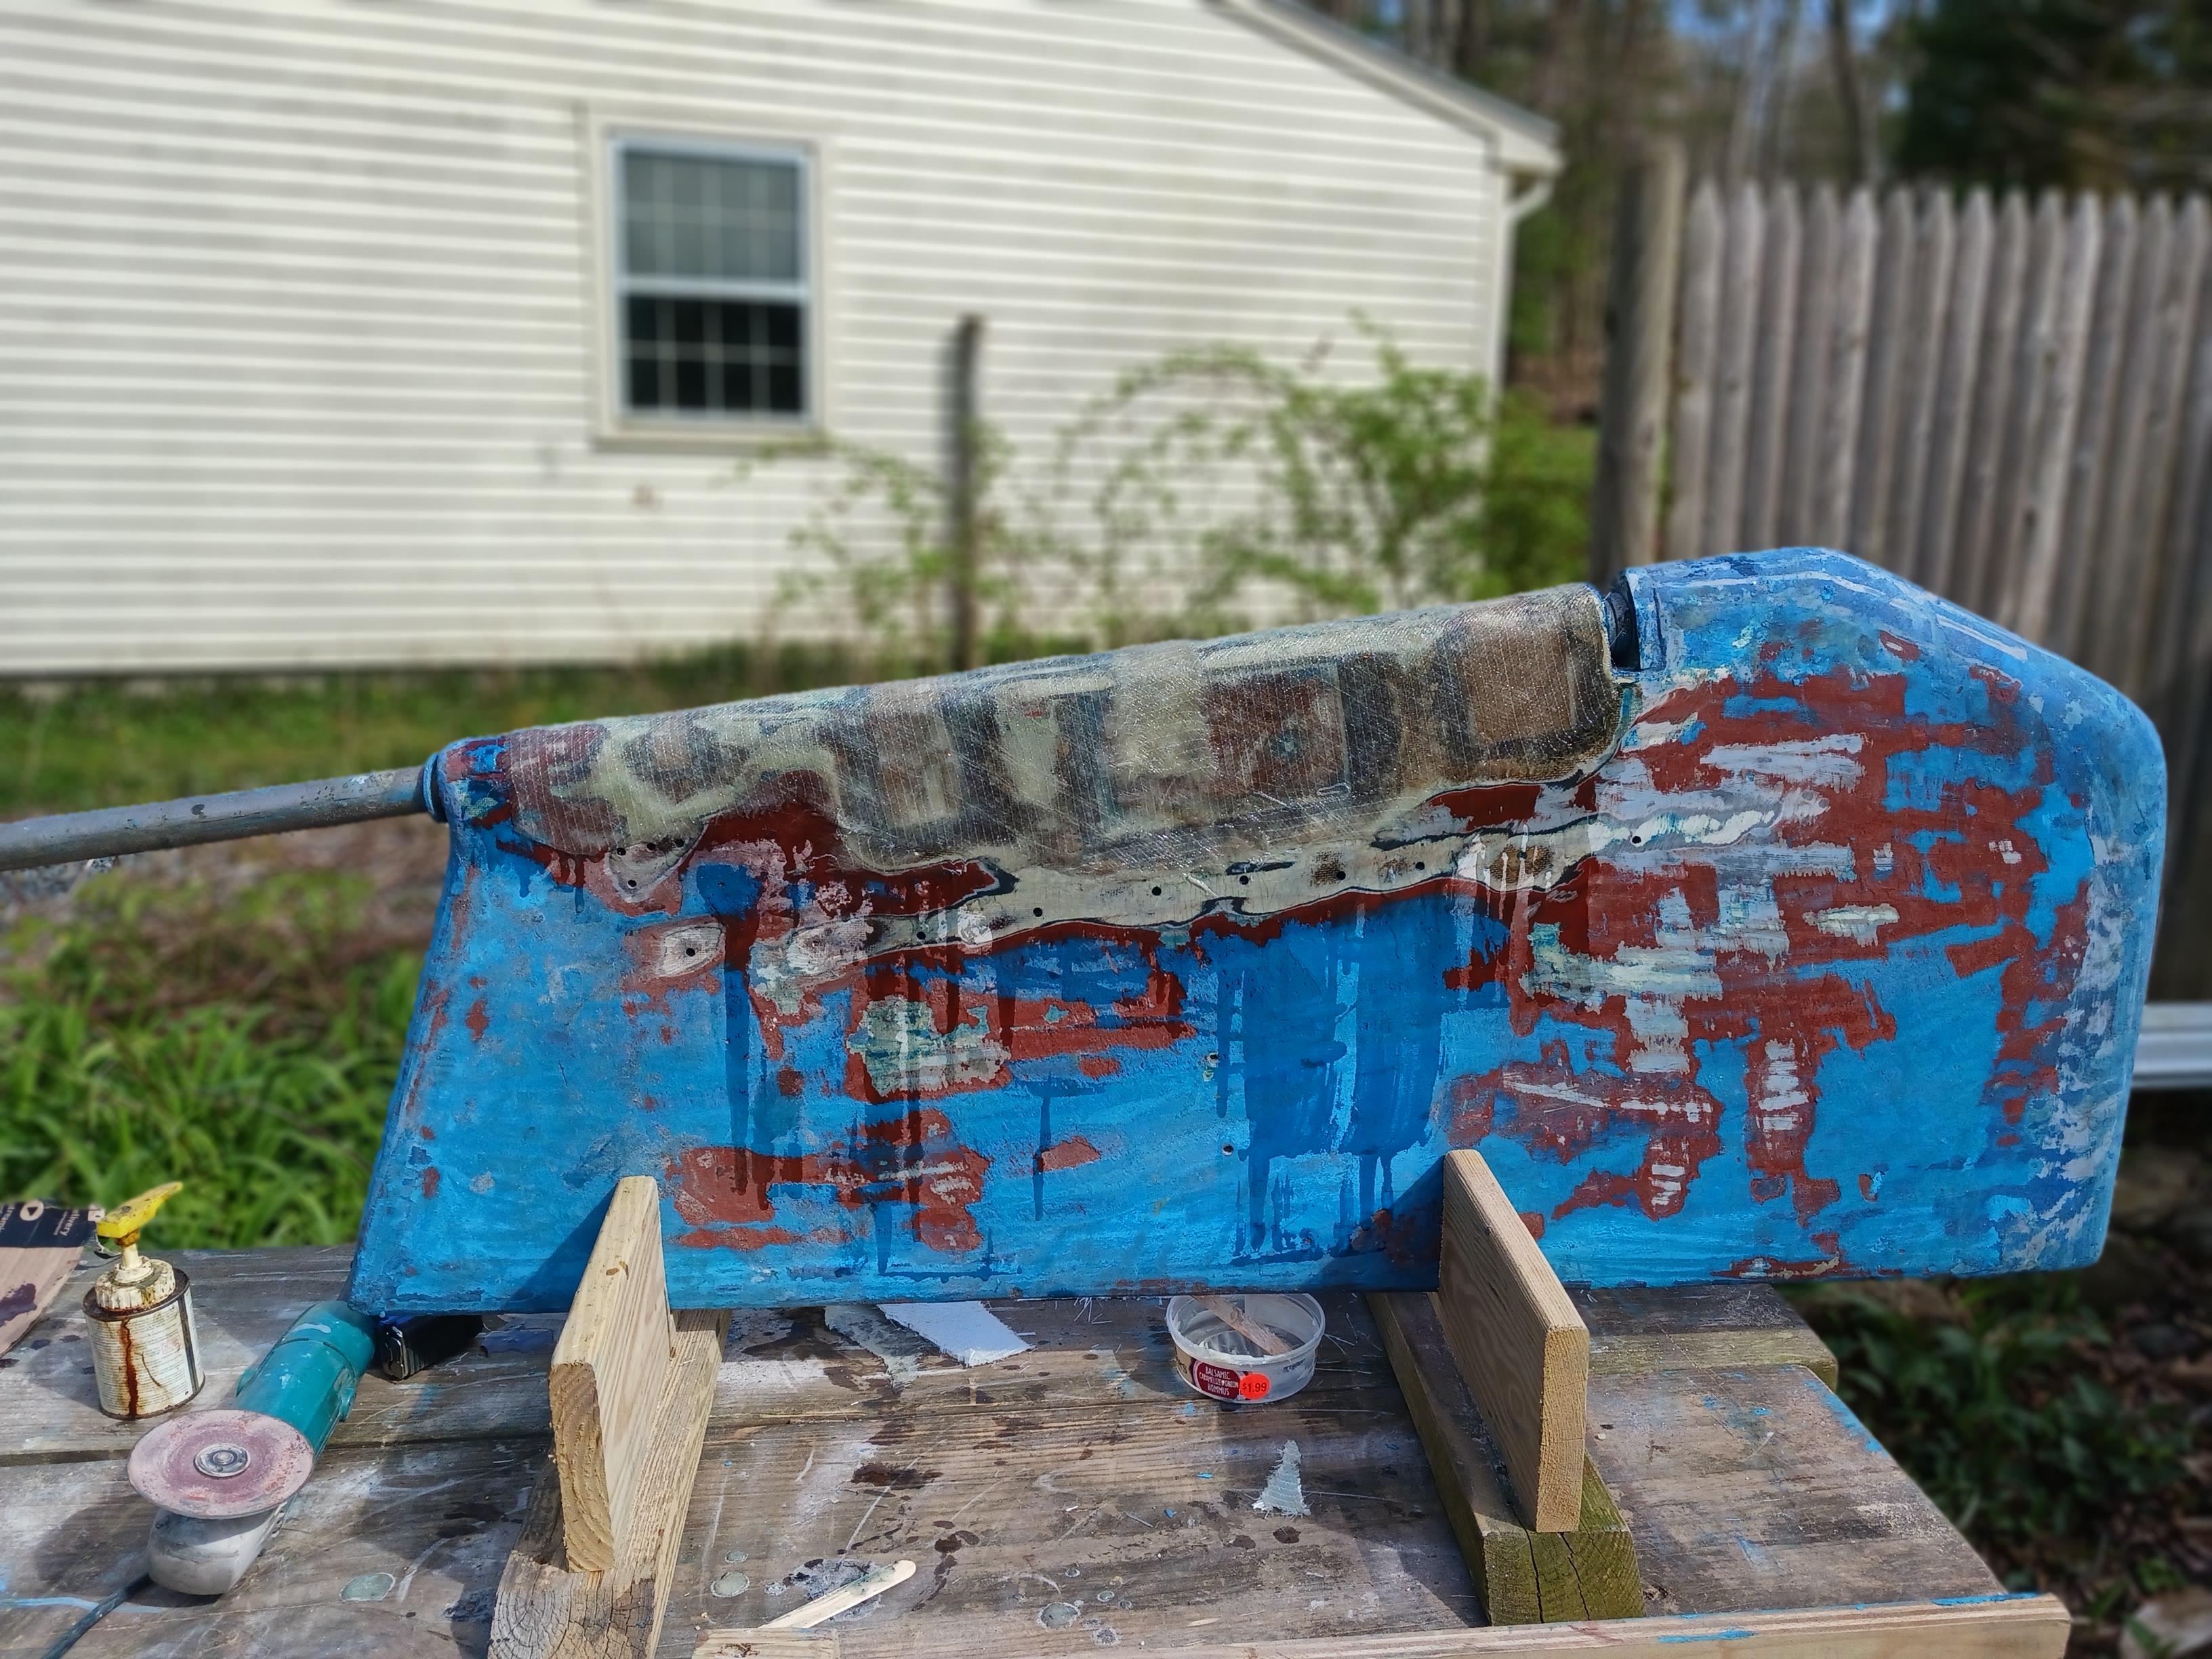
Faired everything, added 3
layers of barrier coat, and installed it. The top of the rudder is
very close to the skeg, like 1/16".

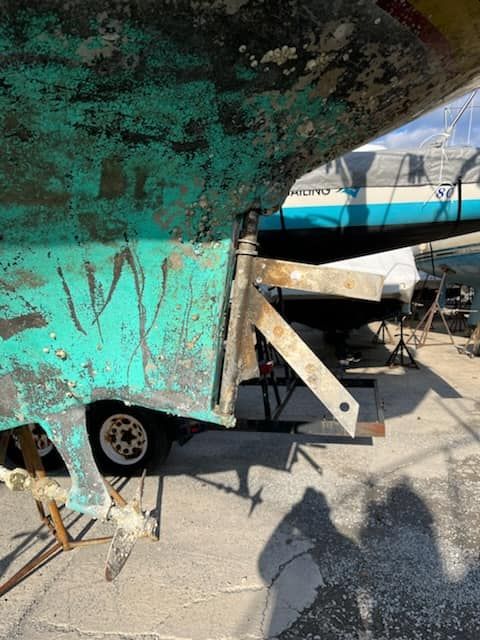
BTW, here is a disturbing image of a more 'standard' Apache 37
rudder that failed in 2021. You can see the 3 plates that I
expected, with the bottom one broken off, and the resulting rudder
gone.
Cabin top sides Delam
I had patched up and
painted the port cabin side to repair a few feet of delam, maybe
2-3 inches wide, just
under the opening ports. I painted the cabin sides over the repair. 15 years
later, it was apparent that my patch wasn't holding. There were
cracks and blisters in a strip almost 10' long. Also the two large
ports were leaking, so this would be a good time to remove and
rebed them.
In the fall of 2021, we hauled early, in mid-September, for a
hurricane that never happened. I took advantage of the nice autumn
weather to do this long-awaited project. I stripped the 15 year old
paint, removed the two large ports, glassed the gap between the outer skin and the
headliner, and ground down about a 10' strip where
the delam was. I added some glass, ground and faired it, and tried
to match the gel-coat color. I don't have good before and after photos, just this
one 'after' example of poor color matched gel-coat. The two ports
are the large ones. Not sure why the photo is upside-down.
The reapair went well. Gelcoat color match is still not perfect,
but at least it is smooth, structurally sound and weatherproof.
The starboard side needs a similar repair, but much smaller.
2020 New Roller Furler
My roller furler was an
ancient Cruising Design continuous line unit. It used an internal
wire halyard and required a temporary halyard to be fitted to
raise or lower the sail. It was not convenient to change sails,
and so we rarely did it. One of the extrusions had some serious
longitudinal cracks, and the furling line regularly jumped the
drum. It was time.
My original small jib was original 1968 vintage. It had been
damaged and I rarely used it. I tried to get a new small jib made
in 2017, but my favorite sailmaker was too busy. So I took the
measurements to Ebay, and found a great North Genoa from a 35'-ish
boat. The UV cover was my color, Captains Navy, and it had the
perfect sail number: 42! The price was right at $500. We put it
on, thinking we would use our 135% when the wind was light. That
was 5 years ago and we have never changed it once. As we get older
and are more conservative sailors, being underpowered is more
desirable than being overpowered. I single-hand a fair amount too.
Whenever the thought enters my mind "Maybe we should change to the
big jib" the wind picks up shortly after. We love our small jib.
We almost never need to reef the jib.
We looked at Harken
furlers, and finally were convinced by Kevin at Northeast
Rigging to use the smaller (Size 1, up to 36') racing version
(MKIV). Going smaller saved $ and weight, and considering that
we regularly use a small jib and so rarely reef, it has worked
very well.
2022 Anchor Windlass
As I age, hoisting our 35#
anchor and 45' chain also gets old. We purchased a new Maxwell
Windlass and installed it on our Summer 2022 Maine Trip. Happy,
Happy, Joy, Joy.
I use a teak fairing block to raise the windlass up a bit since
the chain needs to go up over the bullwark which is nearly 6"
high. The vertical angle is limited to about +/- 6 degrees.
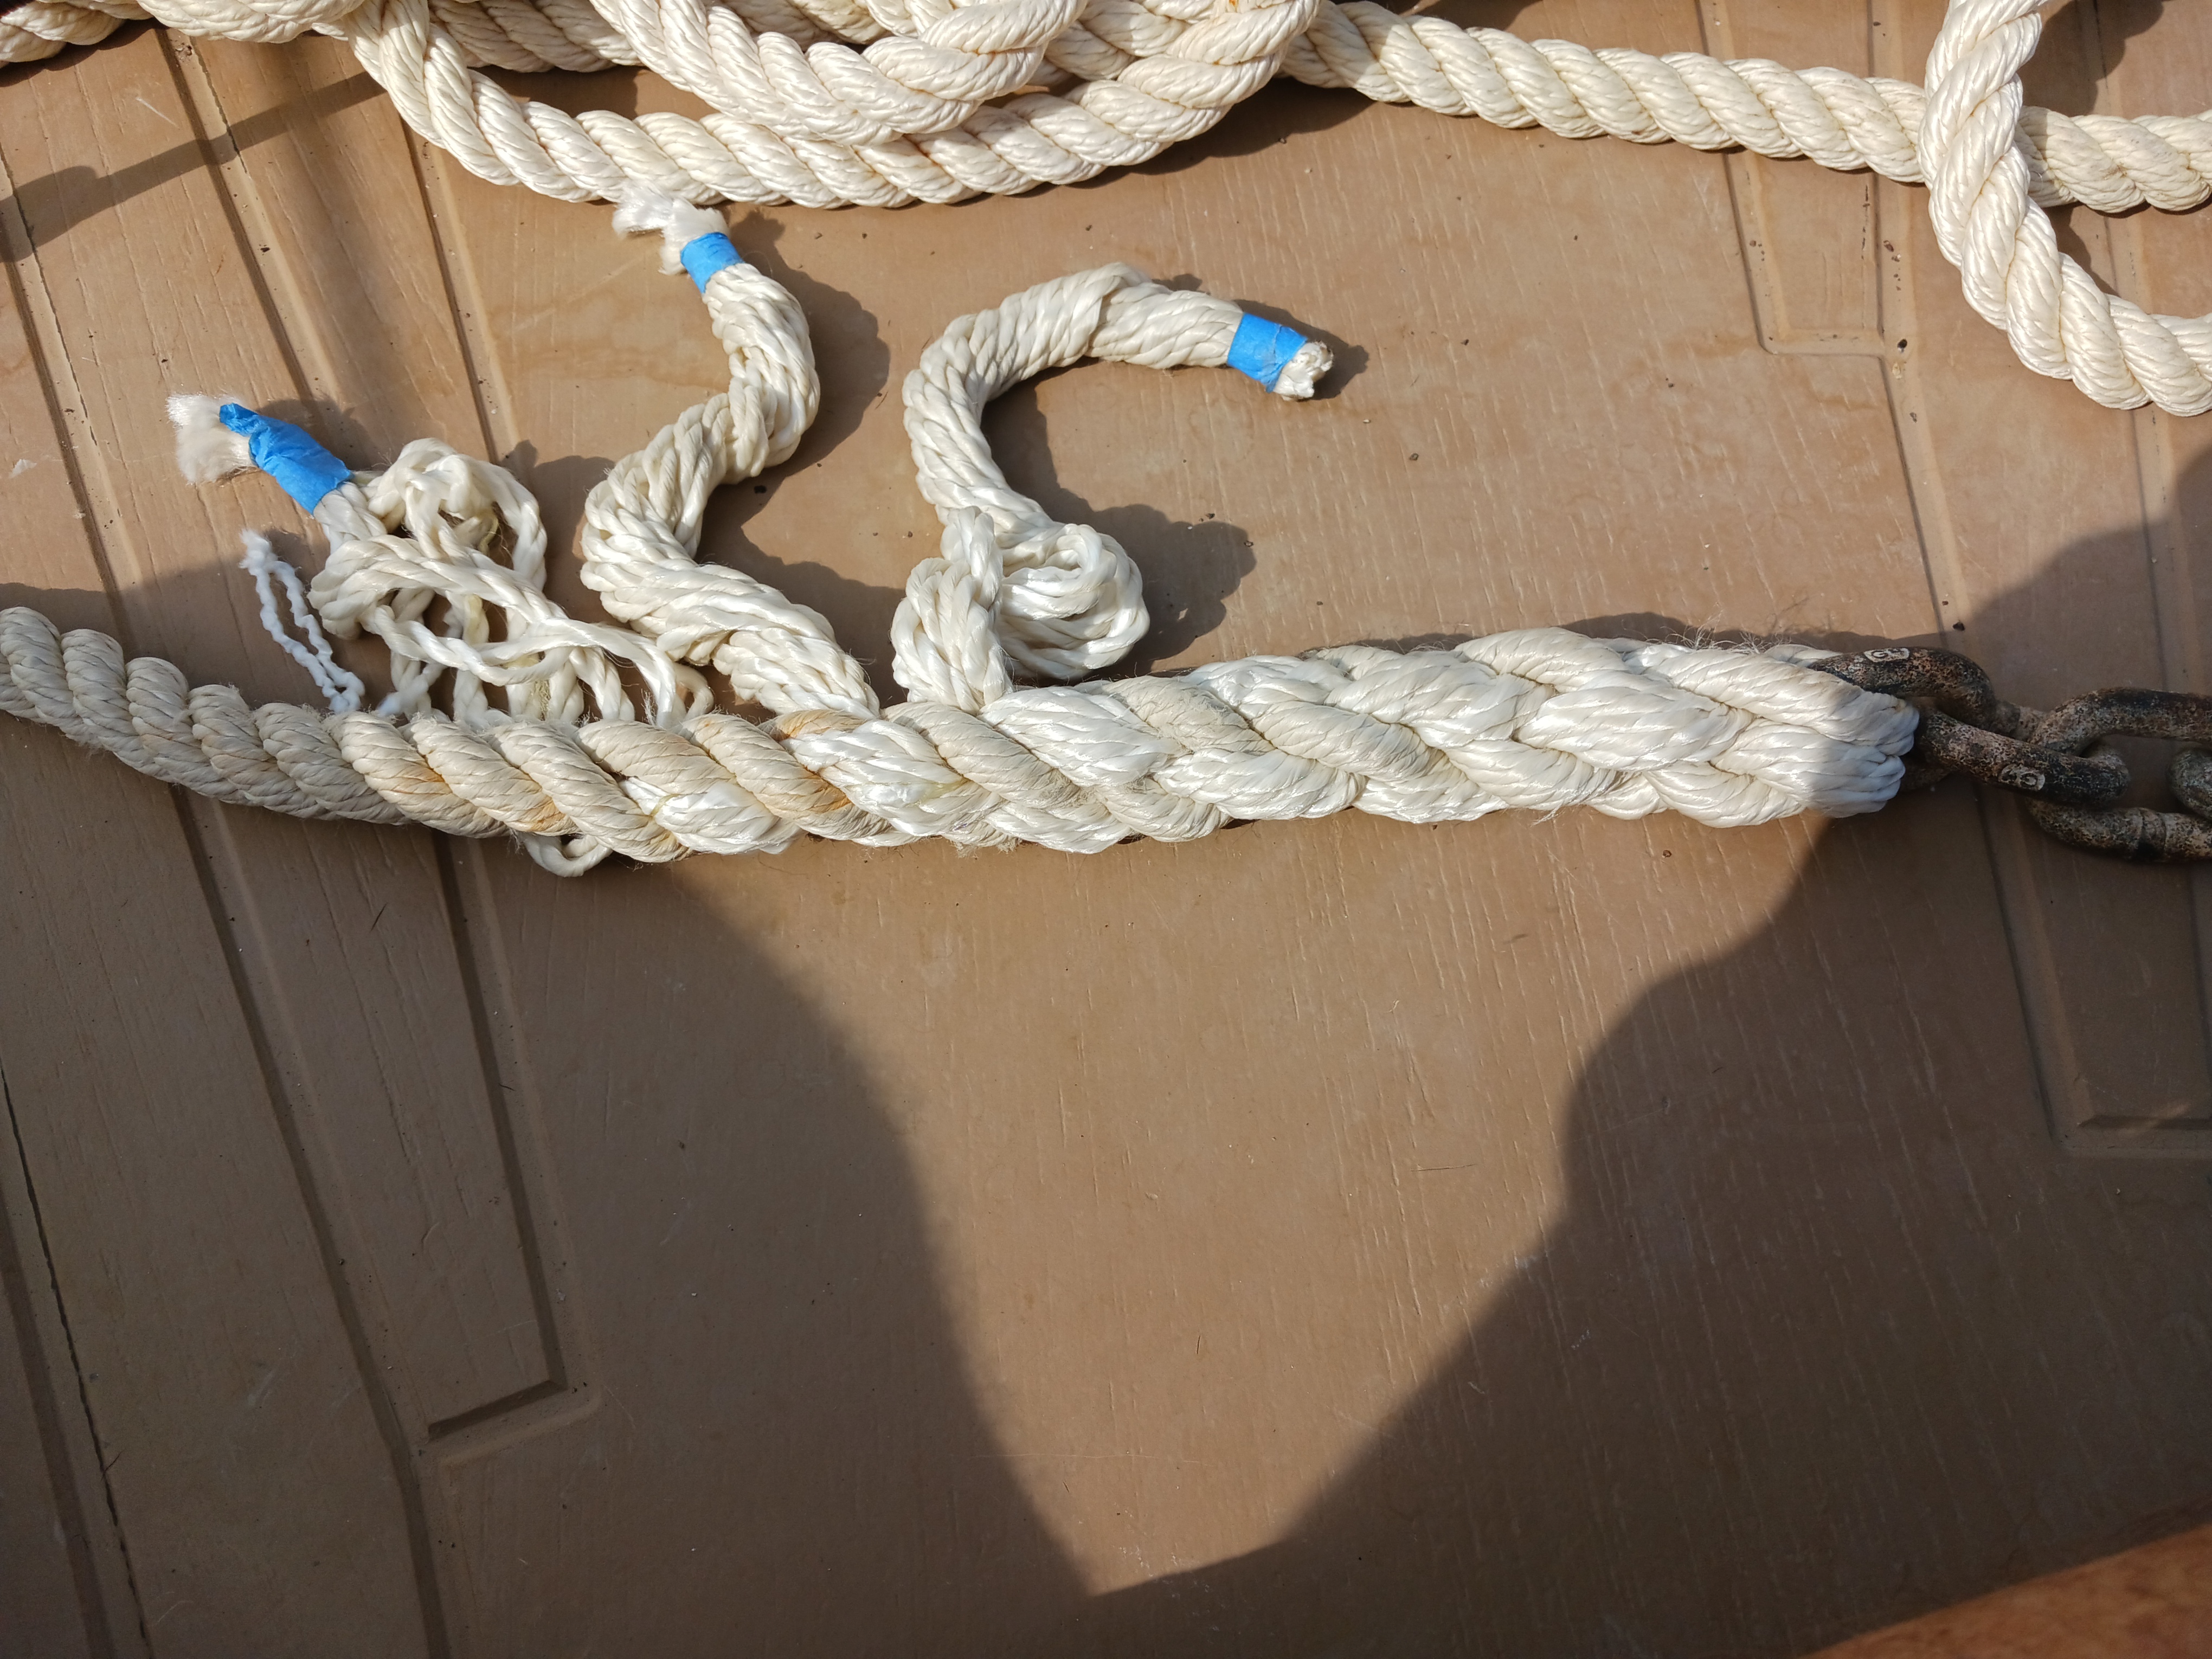
Here is the rope to chain splice in process.
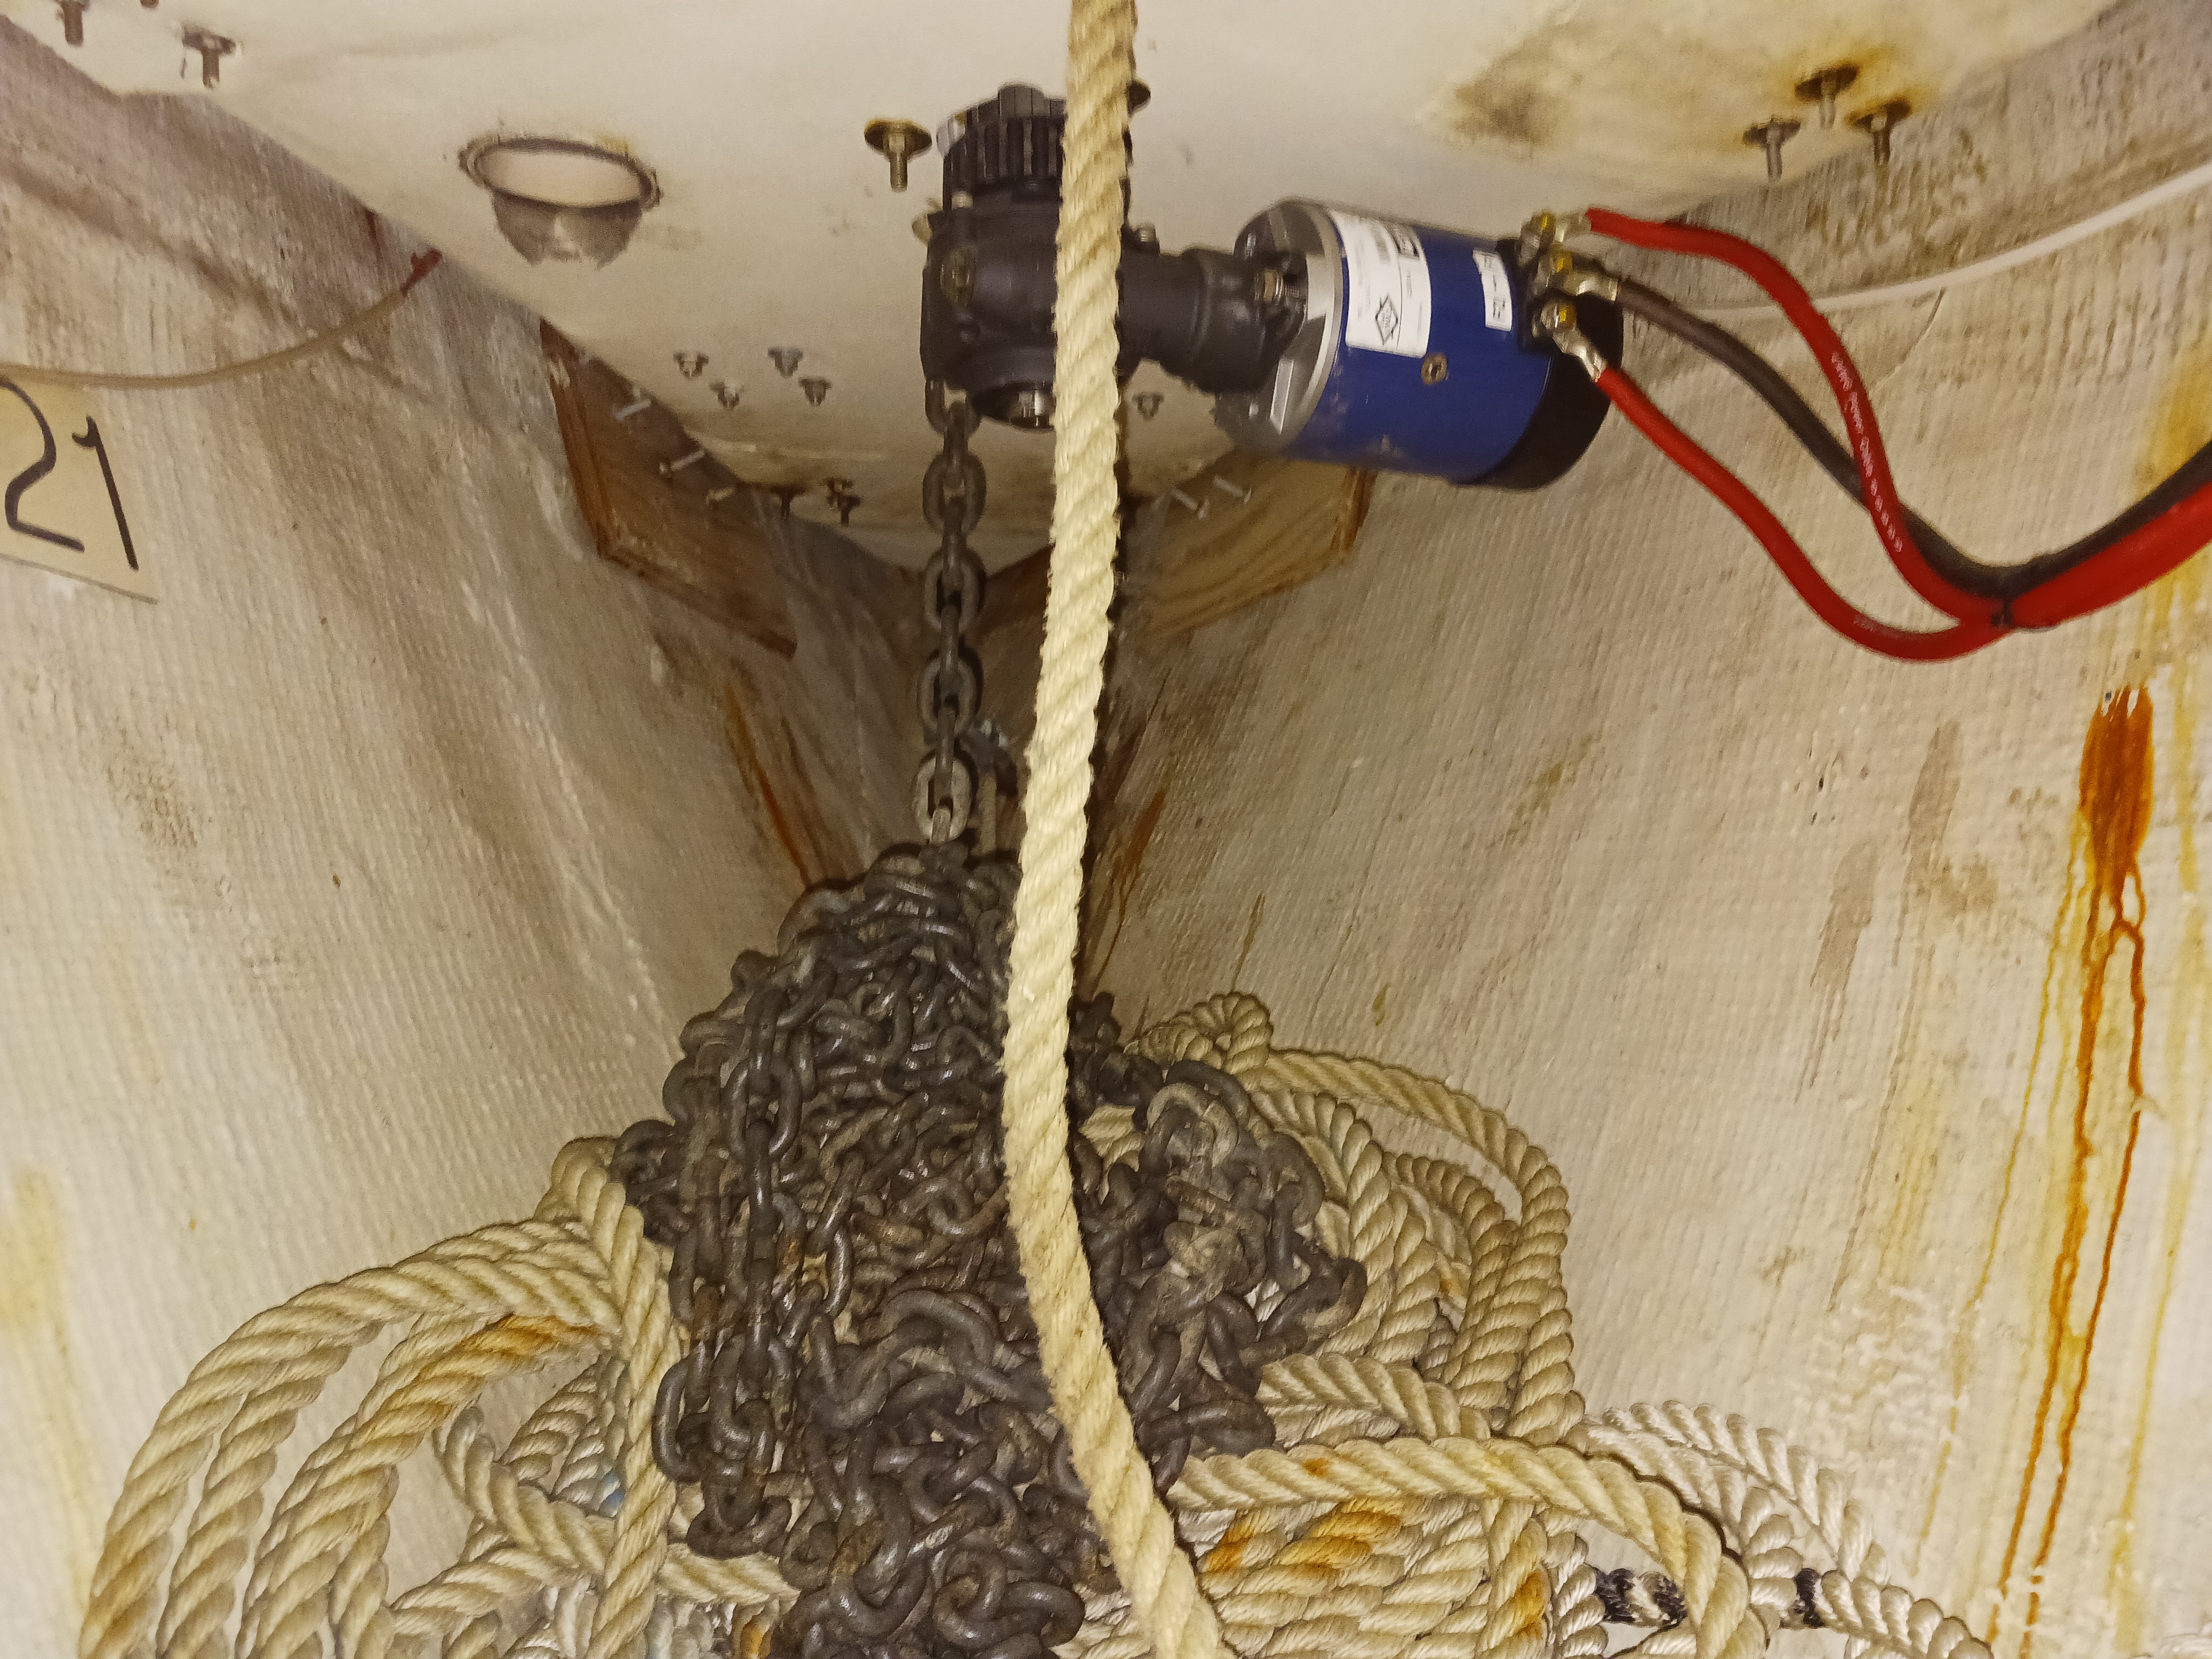
Inside the chain locker. I had some problems with the rope binding
when raising anchor. Originally I thought it was that the chain
drop wasn't enough: it needs to be 12". I removed the windlass and
examined the hole. I use a riser block and the holes in the riser
block and the deck didn't line up perfectly, so the rope was
sticking on the block. I enlarged the block hole to line up with
the deck hole, smoothed the holes, and all is well.
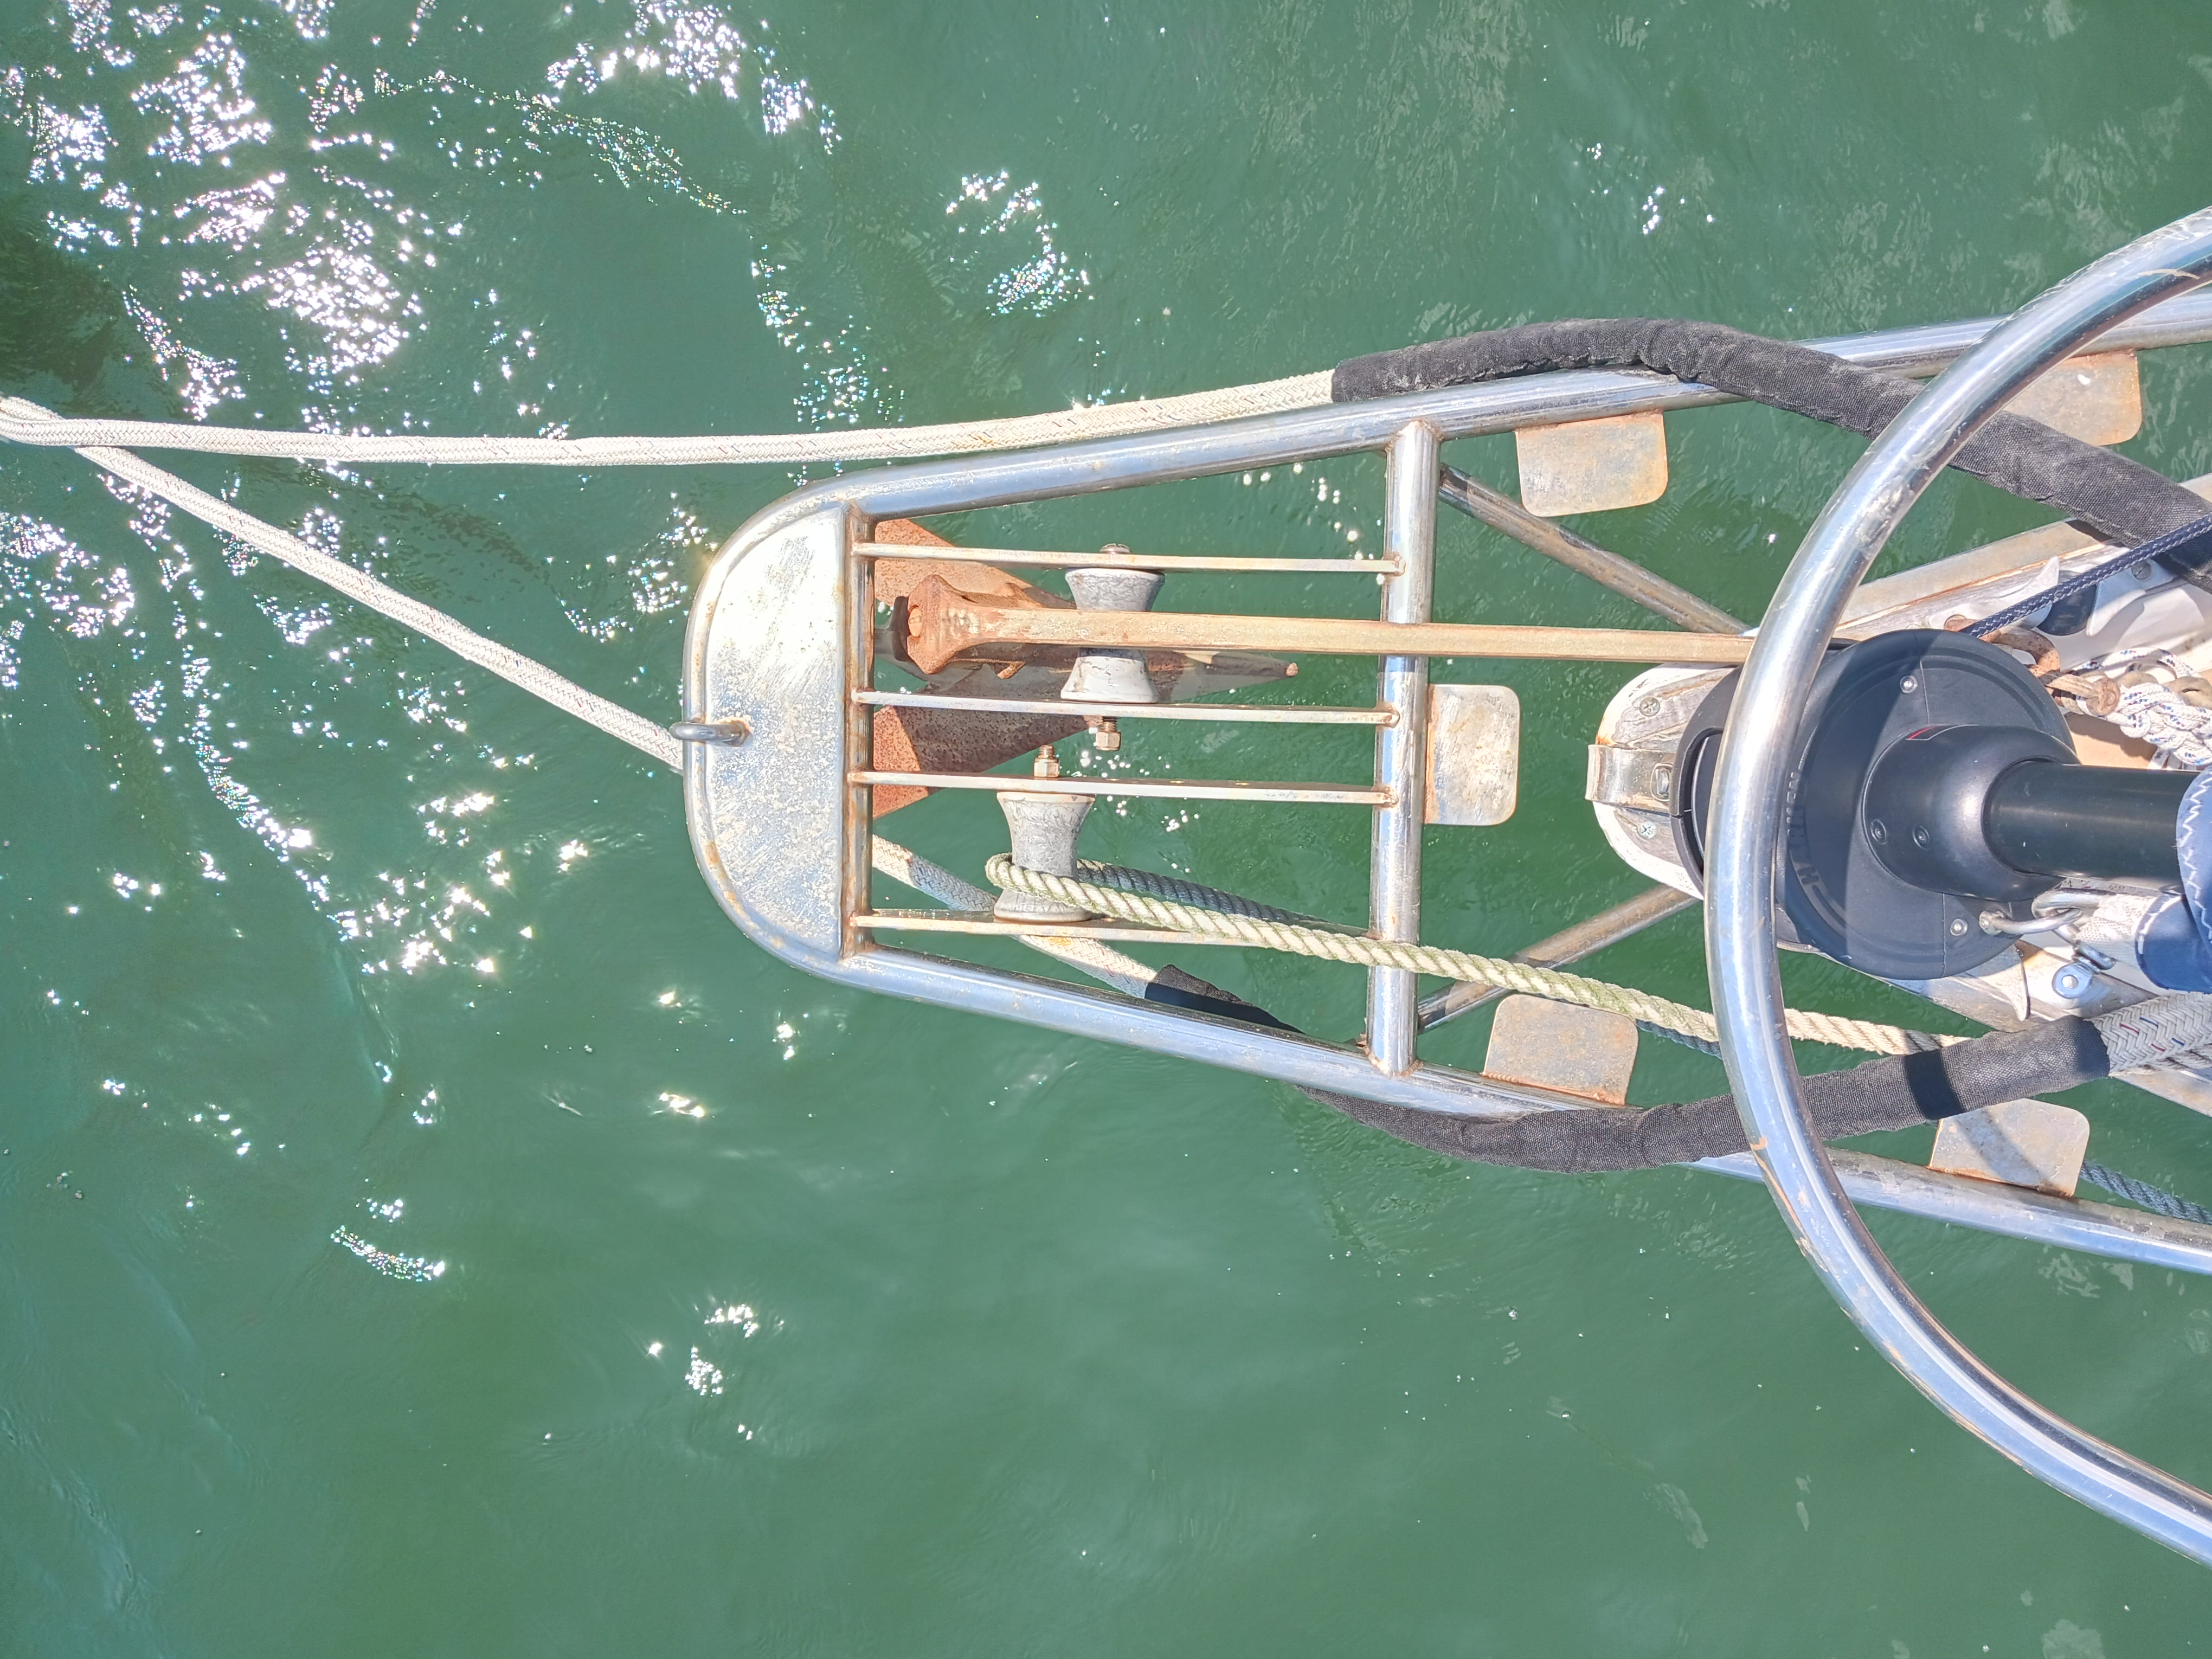
And the anchor. I needed to swap the plow from port to starboard
since the windlass chain is on the starboard side.
2023 Bottom Stripping
I have been wanting to
strip the bottom for years. The old bottom paint is thick and
hard, and sometimes comes off in chunks. The bottom is not smooth.
I tried a few times to strip parts of the bottom. I tried
scraping, sanding, and chemical strippers. It is a messy and
back-breaking job. In addition my boat yard discourages bottom
stripping. I do very small areas and keep the mess cleaned up at
all times.
I saw some reviews, and decided to try a small area of stripper
called Peel-Away
last Fall using their gallon size. It only did about 20 sq ft.
I bought a 5 gallon pail of it ($180) and did the aft, port
quarter this past spring. It easily removed the top layers.
I tried a second application and it helped, but the old hard
bottom paint is really tough. Instead I scraped it with a
two-handed carbide scraper. Tough work, I did a bit at a time.
Eventually I built up my upper-body muscles and we able to do
15-30 minutes of scraping at a time. I did a bit each day until it
was all down to bare gelcoat. Then a final sanding and applied 3
layers of Interlux 2000 barrier coat.
I figure I'll do 1/4 of the hull each year. About 1/5 of it was
already done.
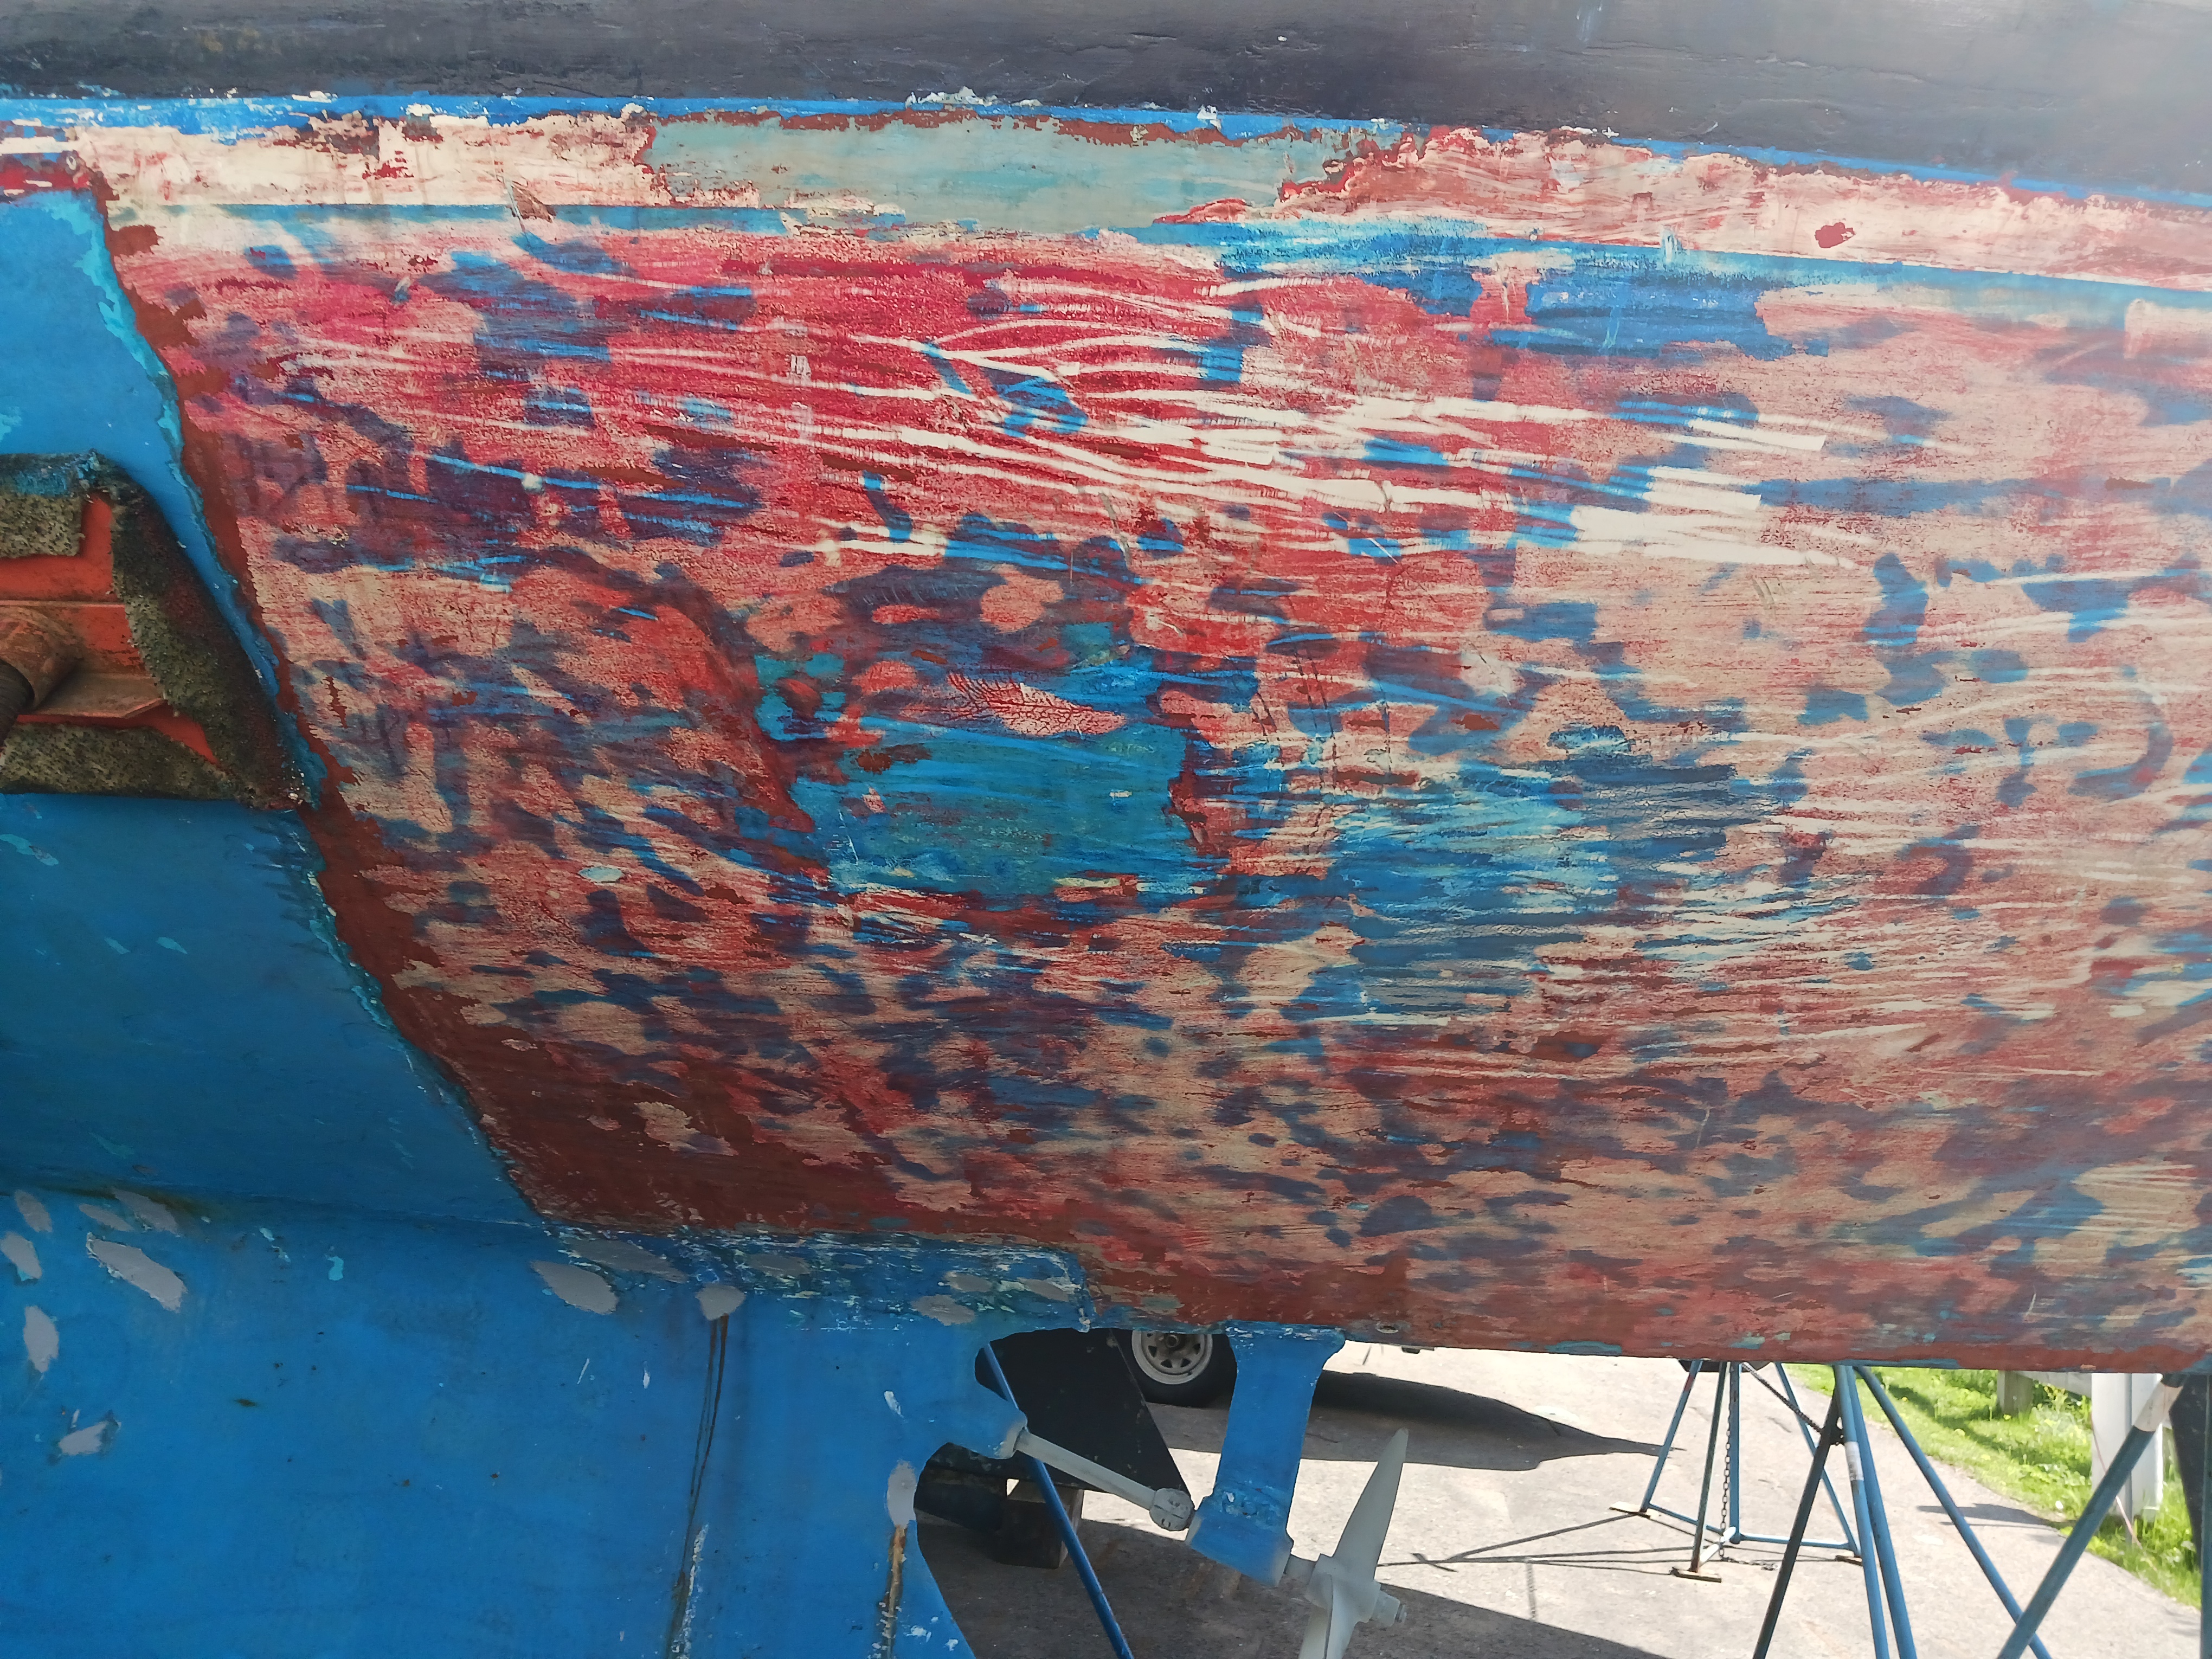
These long scrape marks are not mine, they were there under the
red paint.
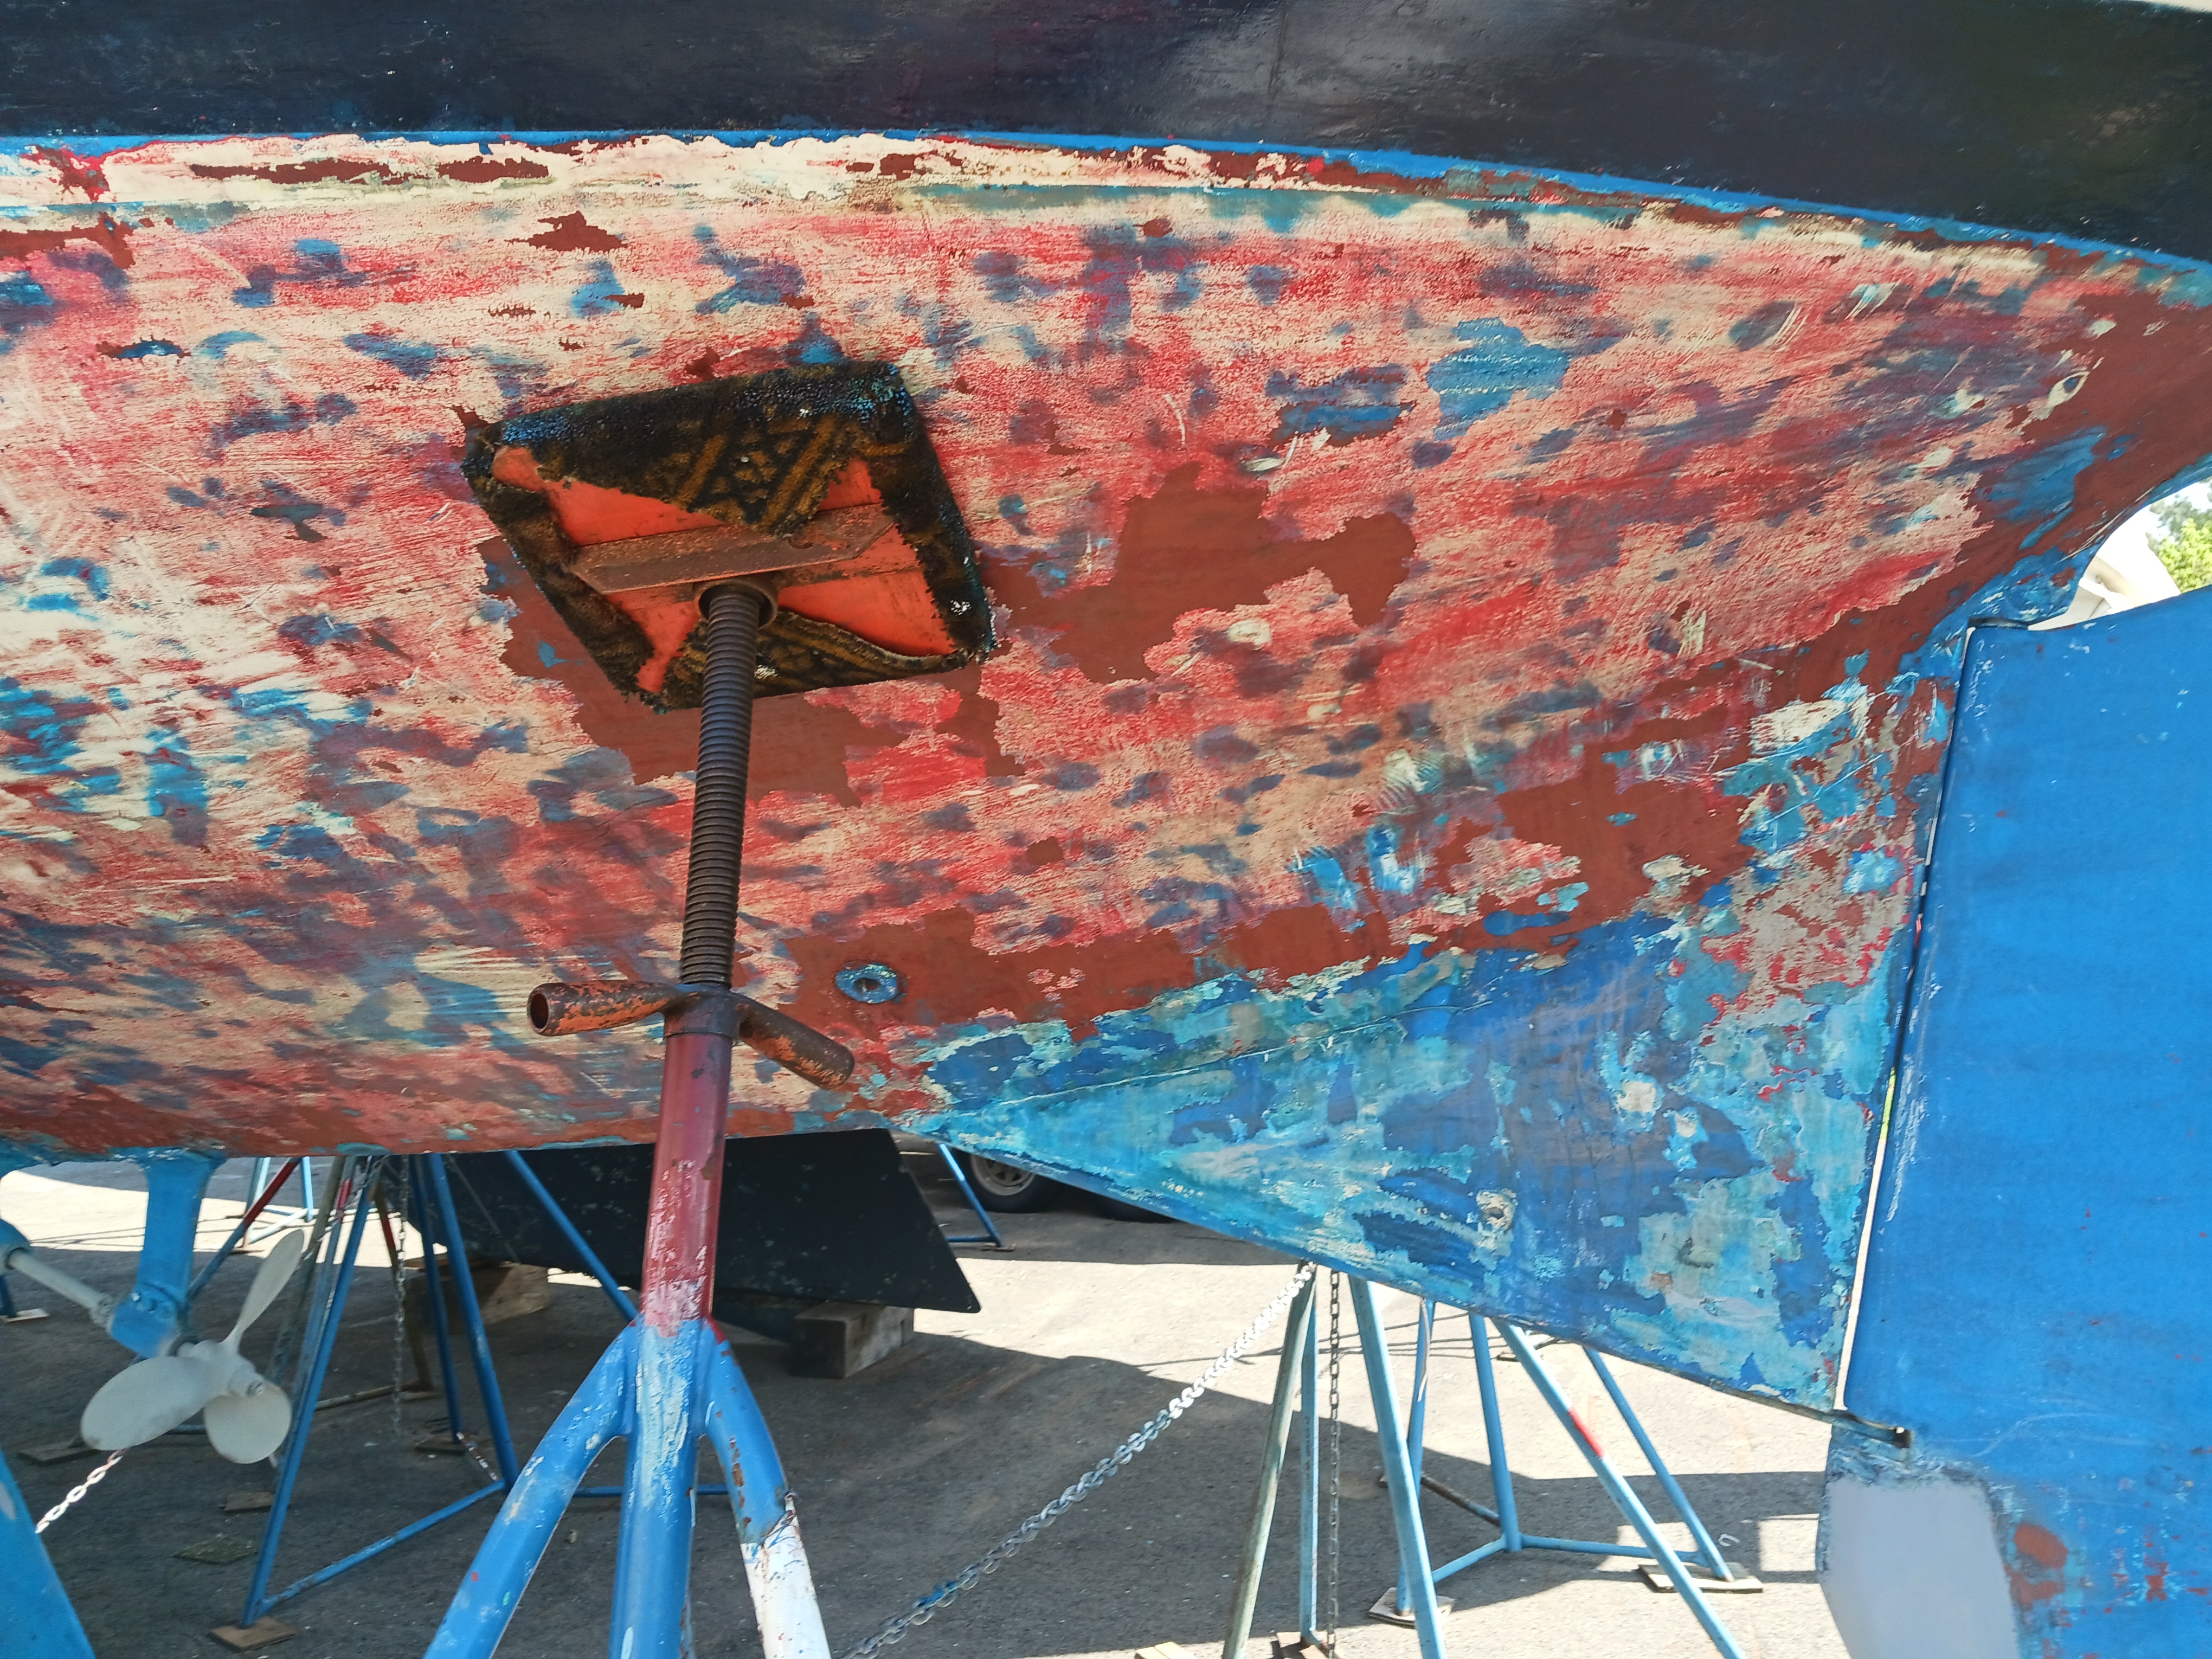
You can see some of the red paint here. The stripper took off many
layers of blue, but the red needed to be scraped.
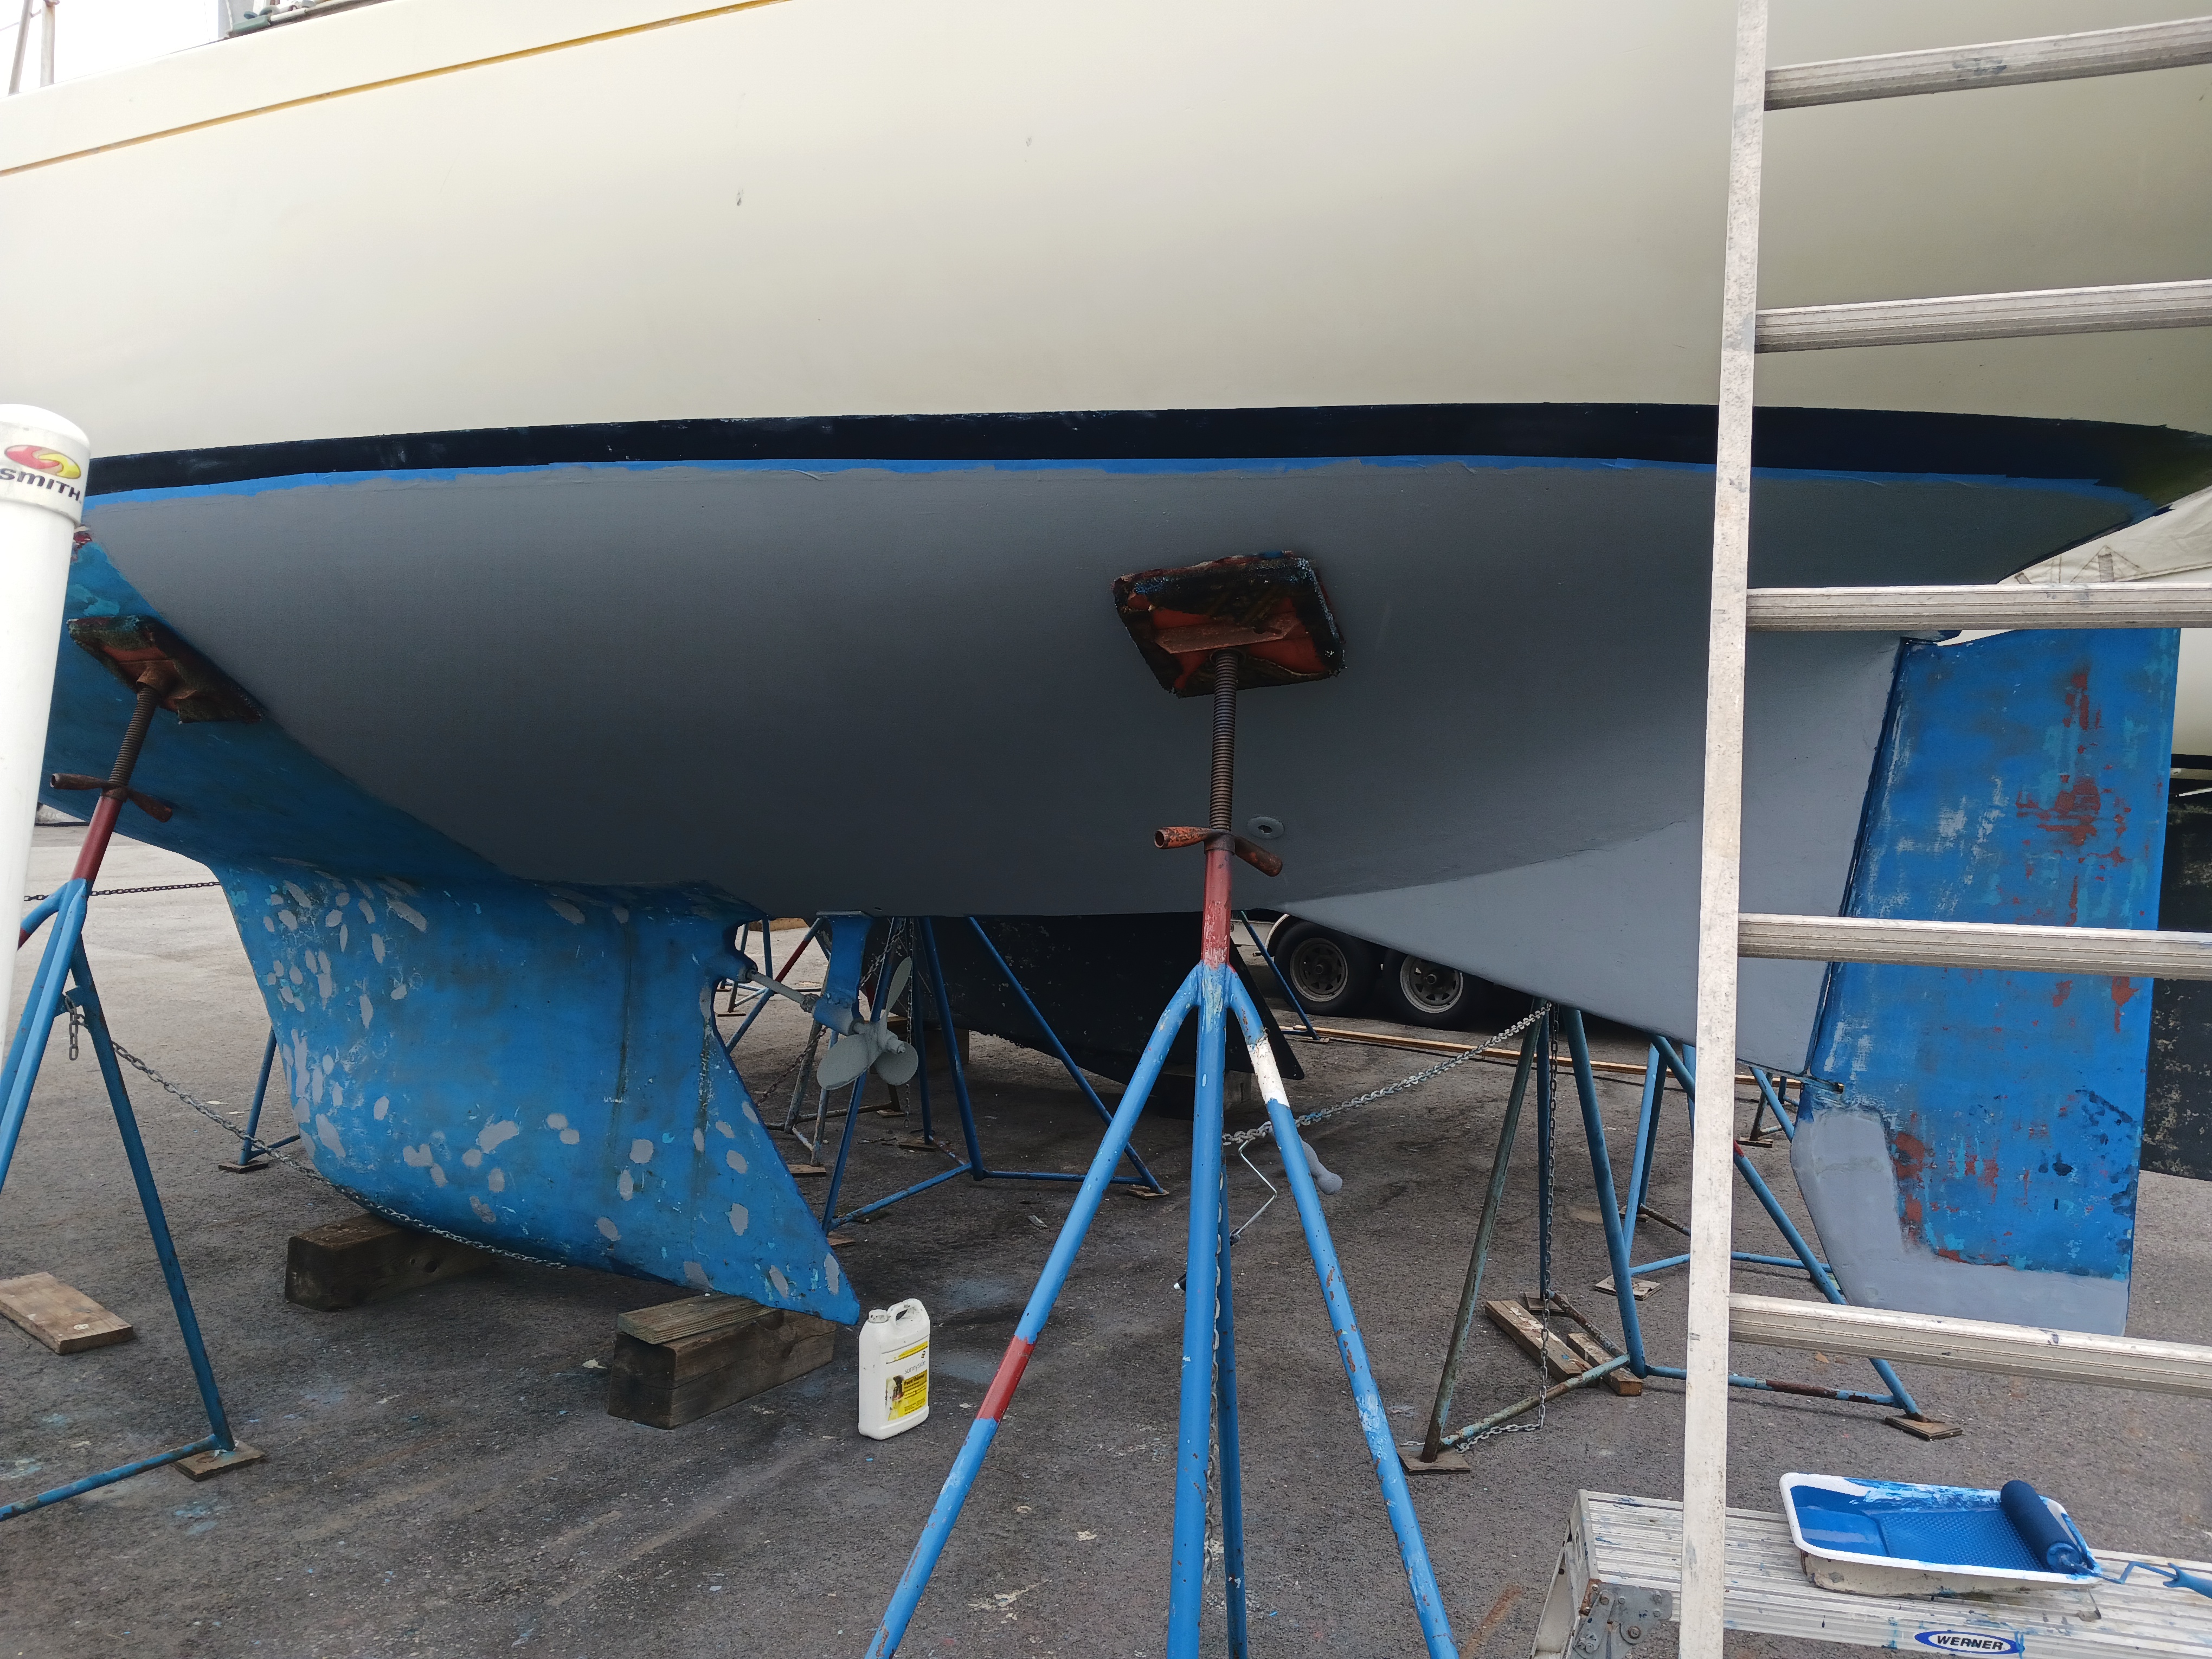
After sanding and a couple of coats of Interlux barrier coat.
Ahhhhh.
2023 Fuel Polishing,
Tank Cleaning
After launching in May
2023, we were motoring to the mooring for the first time of the
season. The engine slowed and died, acting like fuel lines or
filter was plugged. The sight glass on the bottom of the Racor
didn't look too bad. I have a vacuum gauge to tell me when the
filter is clogged, and it read 0 as it always does meaning no
clog. I replaced the filter element and found a bunch of crud in
the filter housing. I checked the vacuum gauge and it was broken,
stuck at 0! A few days later we went for the first sail of the
season. We motored away from the mooring just fine, sailed
for 2 hours, then started the engine to motor back to the mooring.
The engine slowed and died. We sailed back to the mooring. Sailing
had stirred up the tank and plugged the fuel line. .
This identical scenario had occurred in 2014, 9 years ago. At the
time I built a simple fuel cleaning system using a small electric
fuel pump and some cheap plastic fuel filters. The Racor housing
and the fuel lines were badly plugged with diesel bug. I cleaned
the filter, lines and the tank. No problem since then.
I fired up the old electric fuel pump and it did not work. I
contacted a local fuel polisher, but the logistics didn't work. He
needed me to be at a dock with AC power, but the docks he
suggested were unavailable. And I may have had to tow the boat to
the dock. Time to DIY it again, and do it right this time. And
time to be more preventative about this problem in the future.
I bought another cheap ($80) auto-parts-store fuel pump and some
small filters. These filters quickly plugged so I had to
back-flush them several times. But they got most of the major
crud.
Also access to my tank is difficult as the fuel gauge port is
about 8" under the cockpit. I could only access it while lying in
the starboard quarter-berth. Last time, I think I drained
most of the tank, removed all the fittings, loosened the straps,
and and tilted the circular tank to starboard about 30 degrees, to
make accessing the port easier. Ugh. This time I cut a 6" hole in
the cockpit sole just above the tank. I made a simple 1/8"
aluminum cover. This made accessing the tank so much easier.
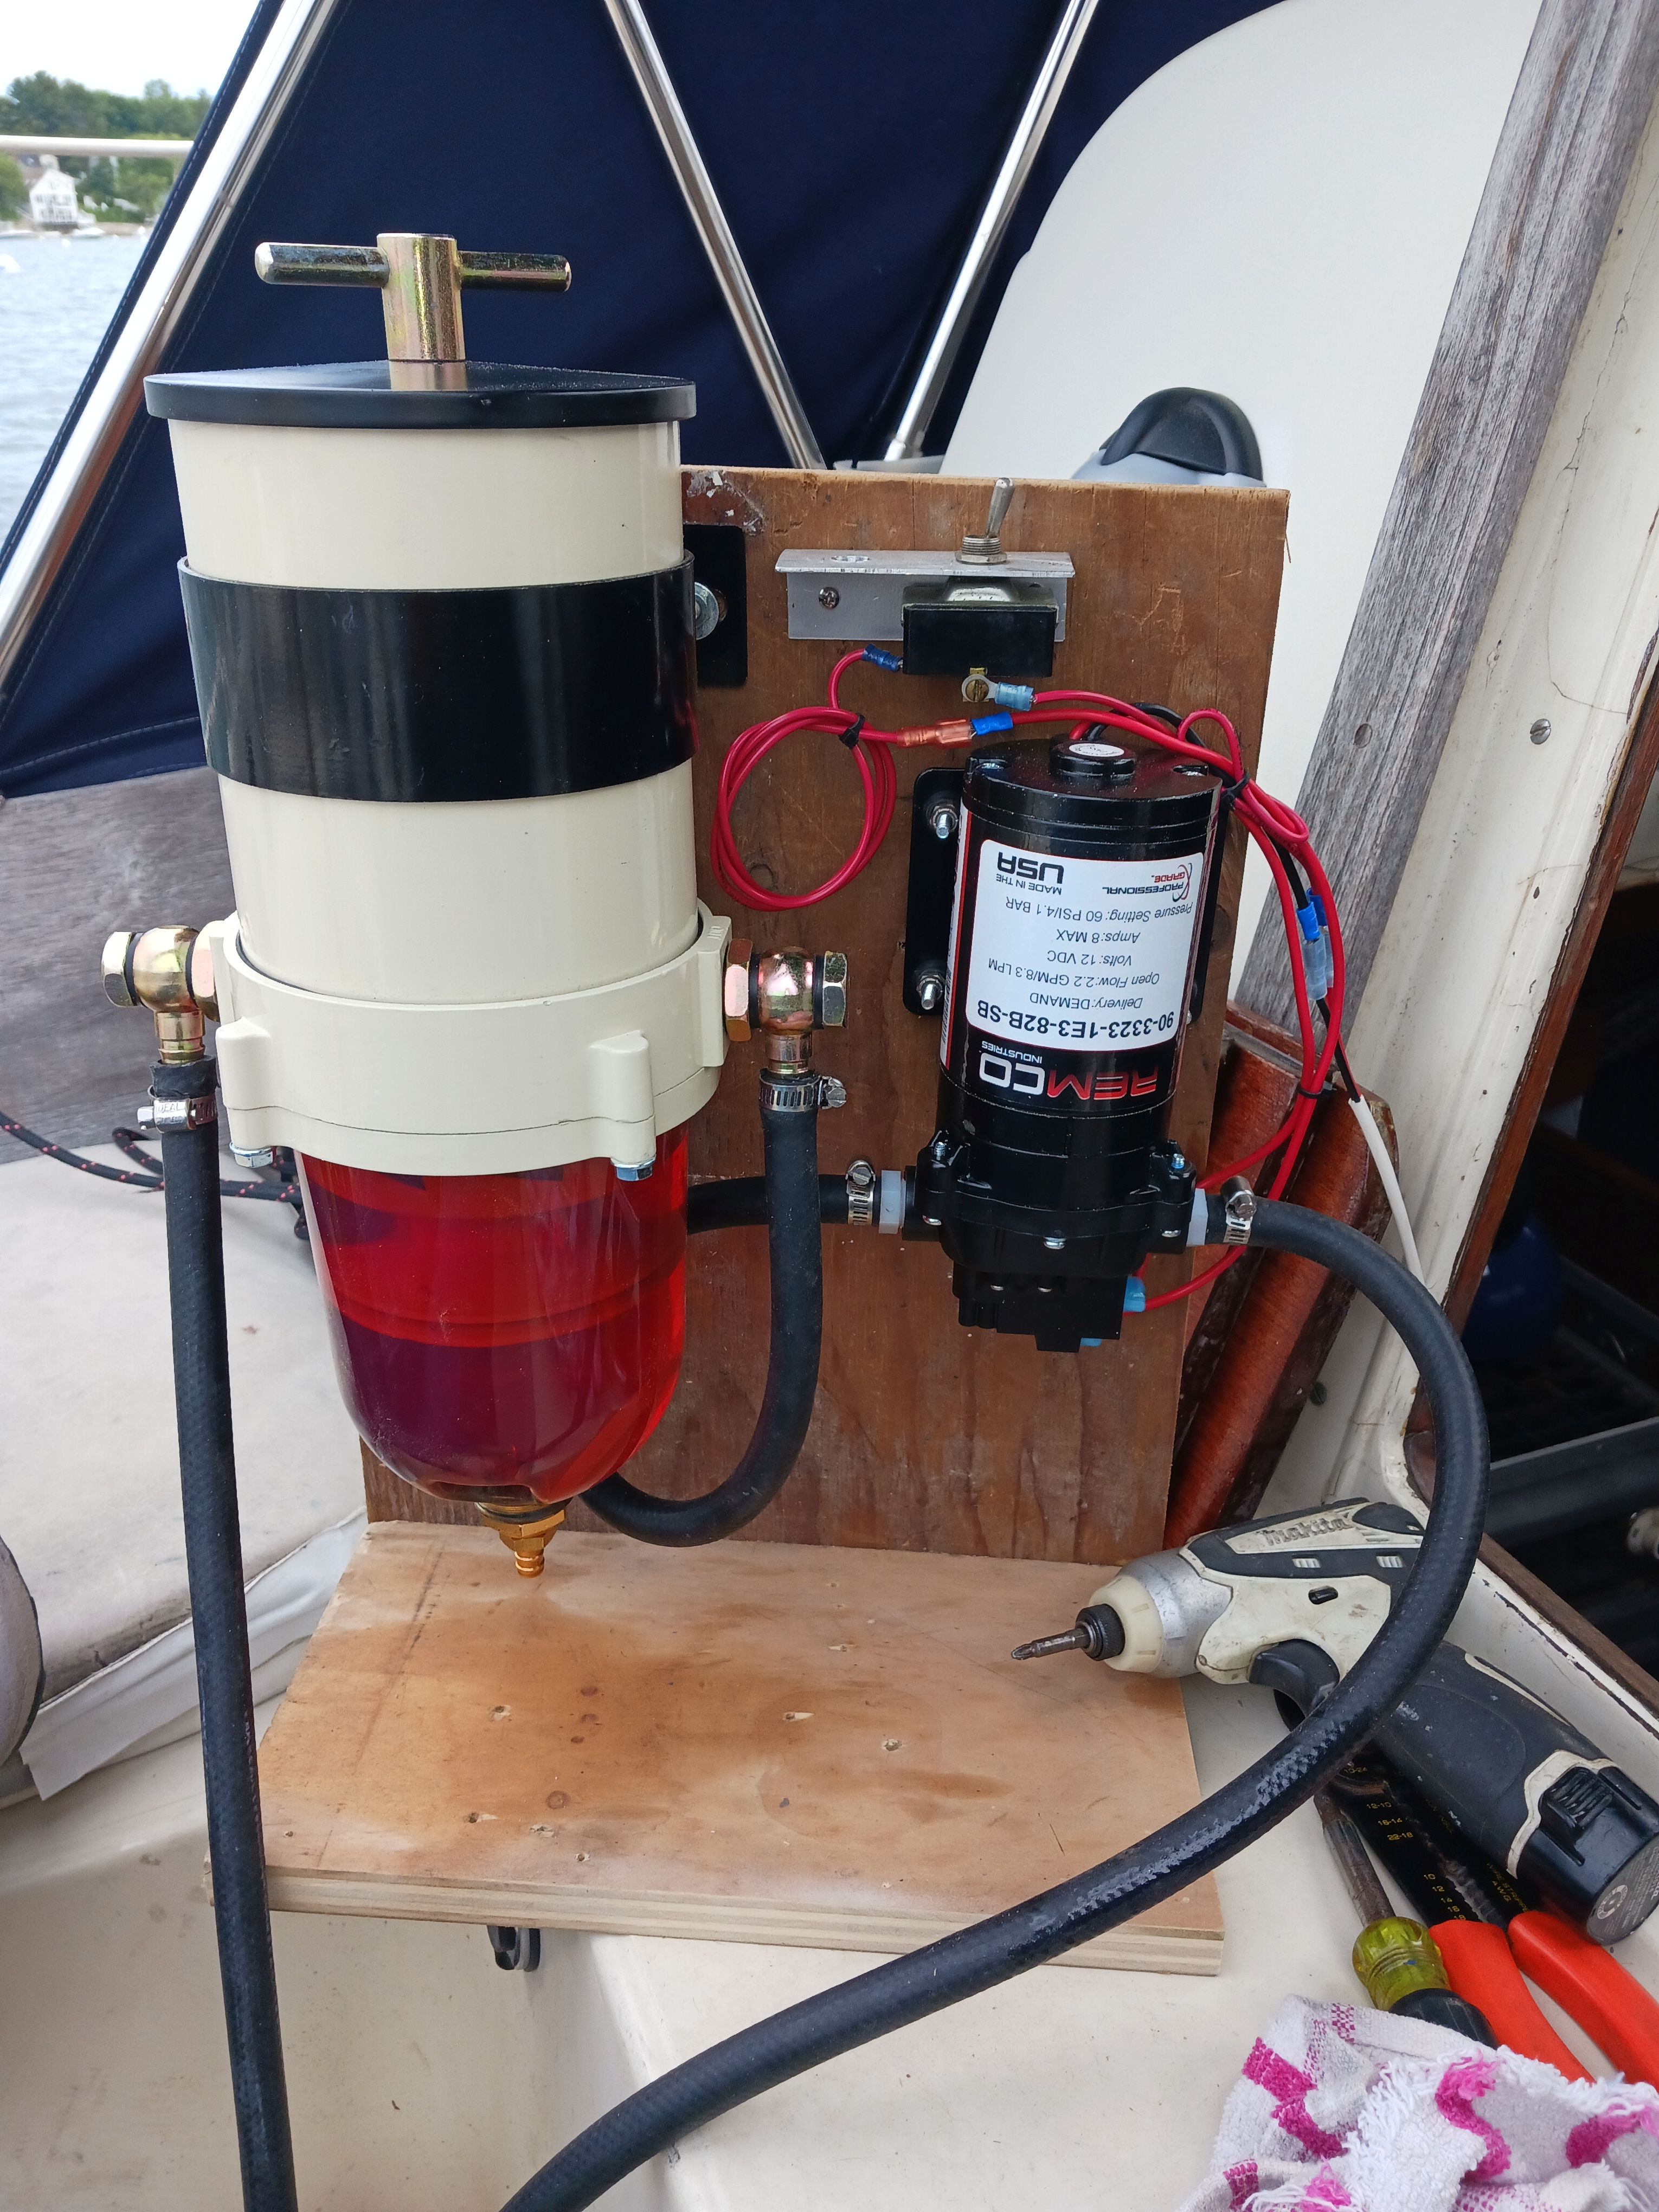
I investigated better fuel pumps and filters, and found what I
think is an ideal combination. The small parts-store or Amazon
electric fuel pumps are low capacity and don't prime well. The
ones intended for fuel transfer are high capacity (10 gal / min)
and can overwhelm a filter. Tractor Supply has pumps made by
Remco, Fimco and others, and intended for chemical spraying
including oil based fertilizers. They are about 2-4 gal / min and
about $100. I bought the Remco
3300 and it worked very well.
For a filter, you need a large one to handle 2 gal/min. I found a
Racor
900 Chinese clone on Amazon for just $52. Perfect! 30 micron
filter elements are about $13. Not sure I would use a cheap clone
filter permanently on my boat, but for this once-a-year
fuel-polishing job, it seemed ideal. I used 3/8" flexible sprayer
hose, also from Tractor Supply. Worked well.
I mounted the pump, filter, and a switch to some scrap plywood,
and use a 3/8" OD bend-able copper tube in the tank. It reaches
all the nooks and crannies. I used an inspection camera to inspect
the dry parts of the tank to check for diesel bug.
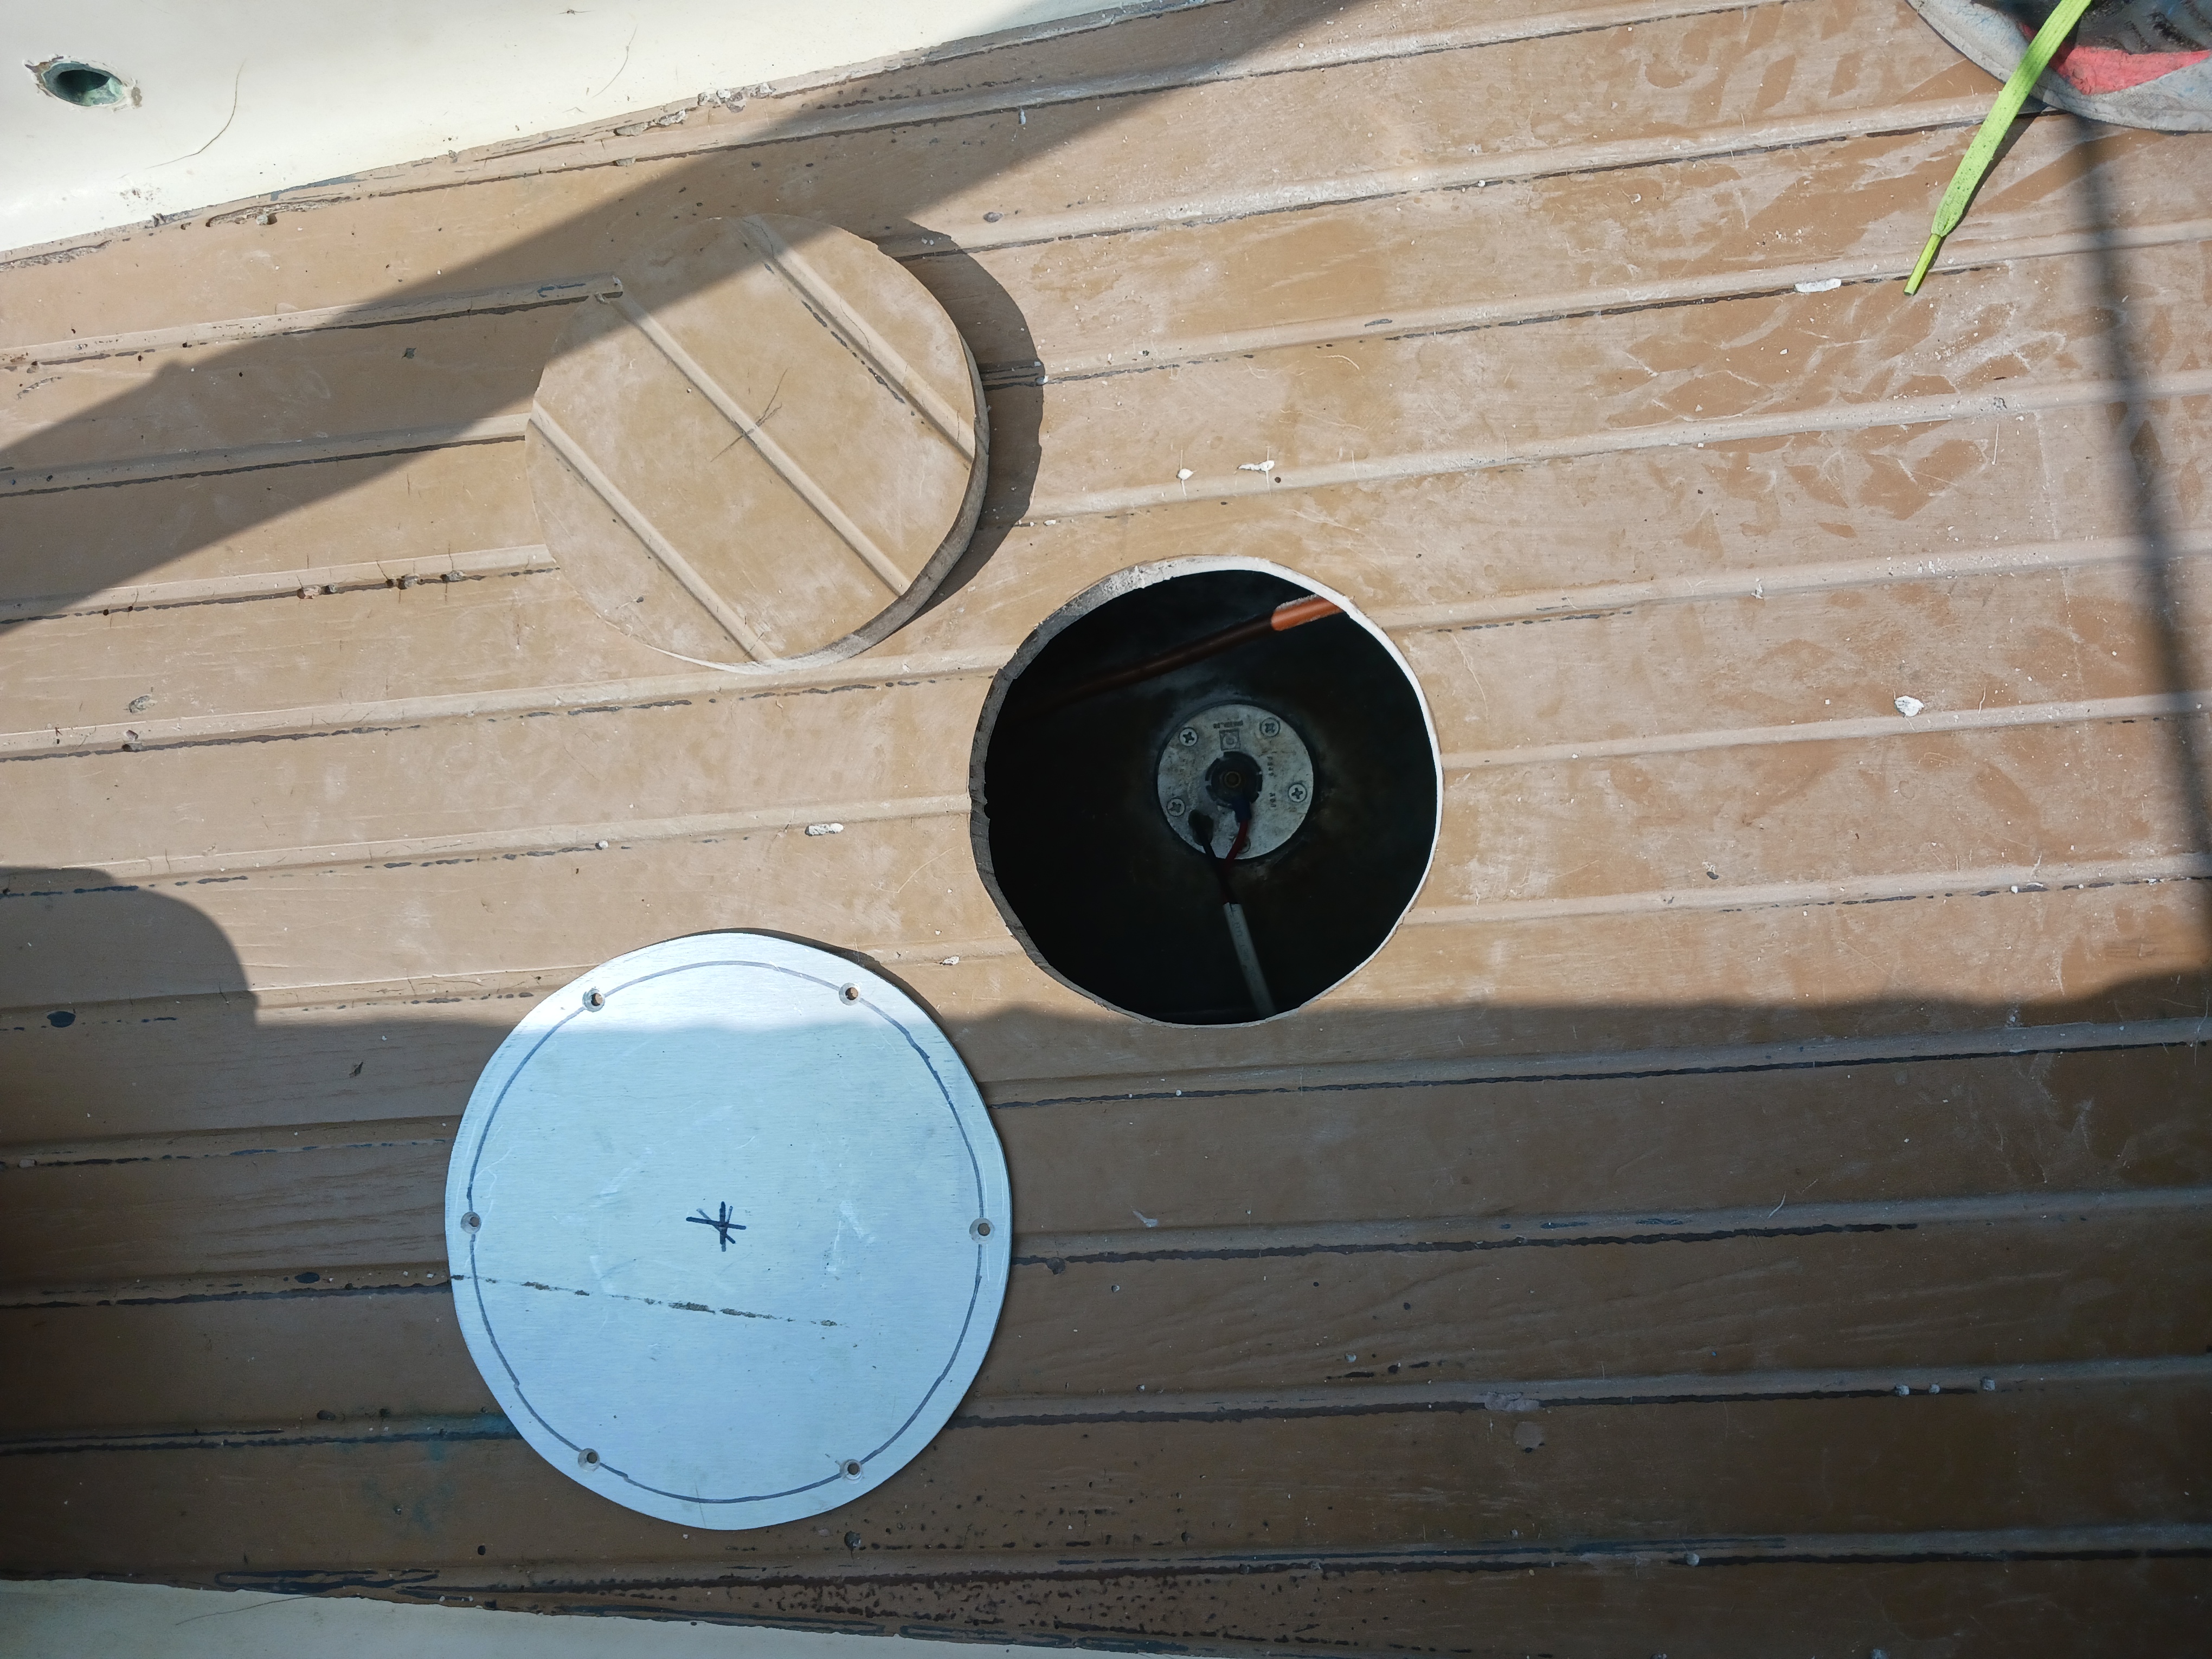
Here is the 6" hole I cut in the cockpit sole. Got to love that
Apache 37 foam-core deck layup. I plan to recess the aluminum
cover a bit. Spring boatyard project.
So if you have an old boat with an old diesel tank, here are my
recommendations:
- Build
a fuel polishing / tank cleaning system (<$200)
- Make
the tank easy to access
- Clean
the tank and polish the fuel in the spring, every year or two
- Fill
the tank before winter storage to reduce condensation. (I
usually had 1/2-3/4 tank, never full.)
- Use
a good fuel treatment religiously, including jerry cans. (I
was not very religious. I am now.)
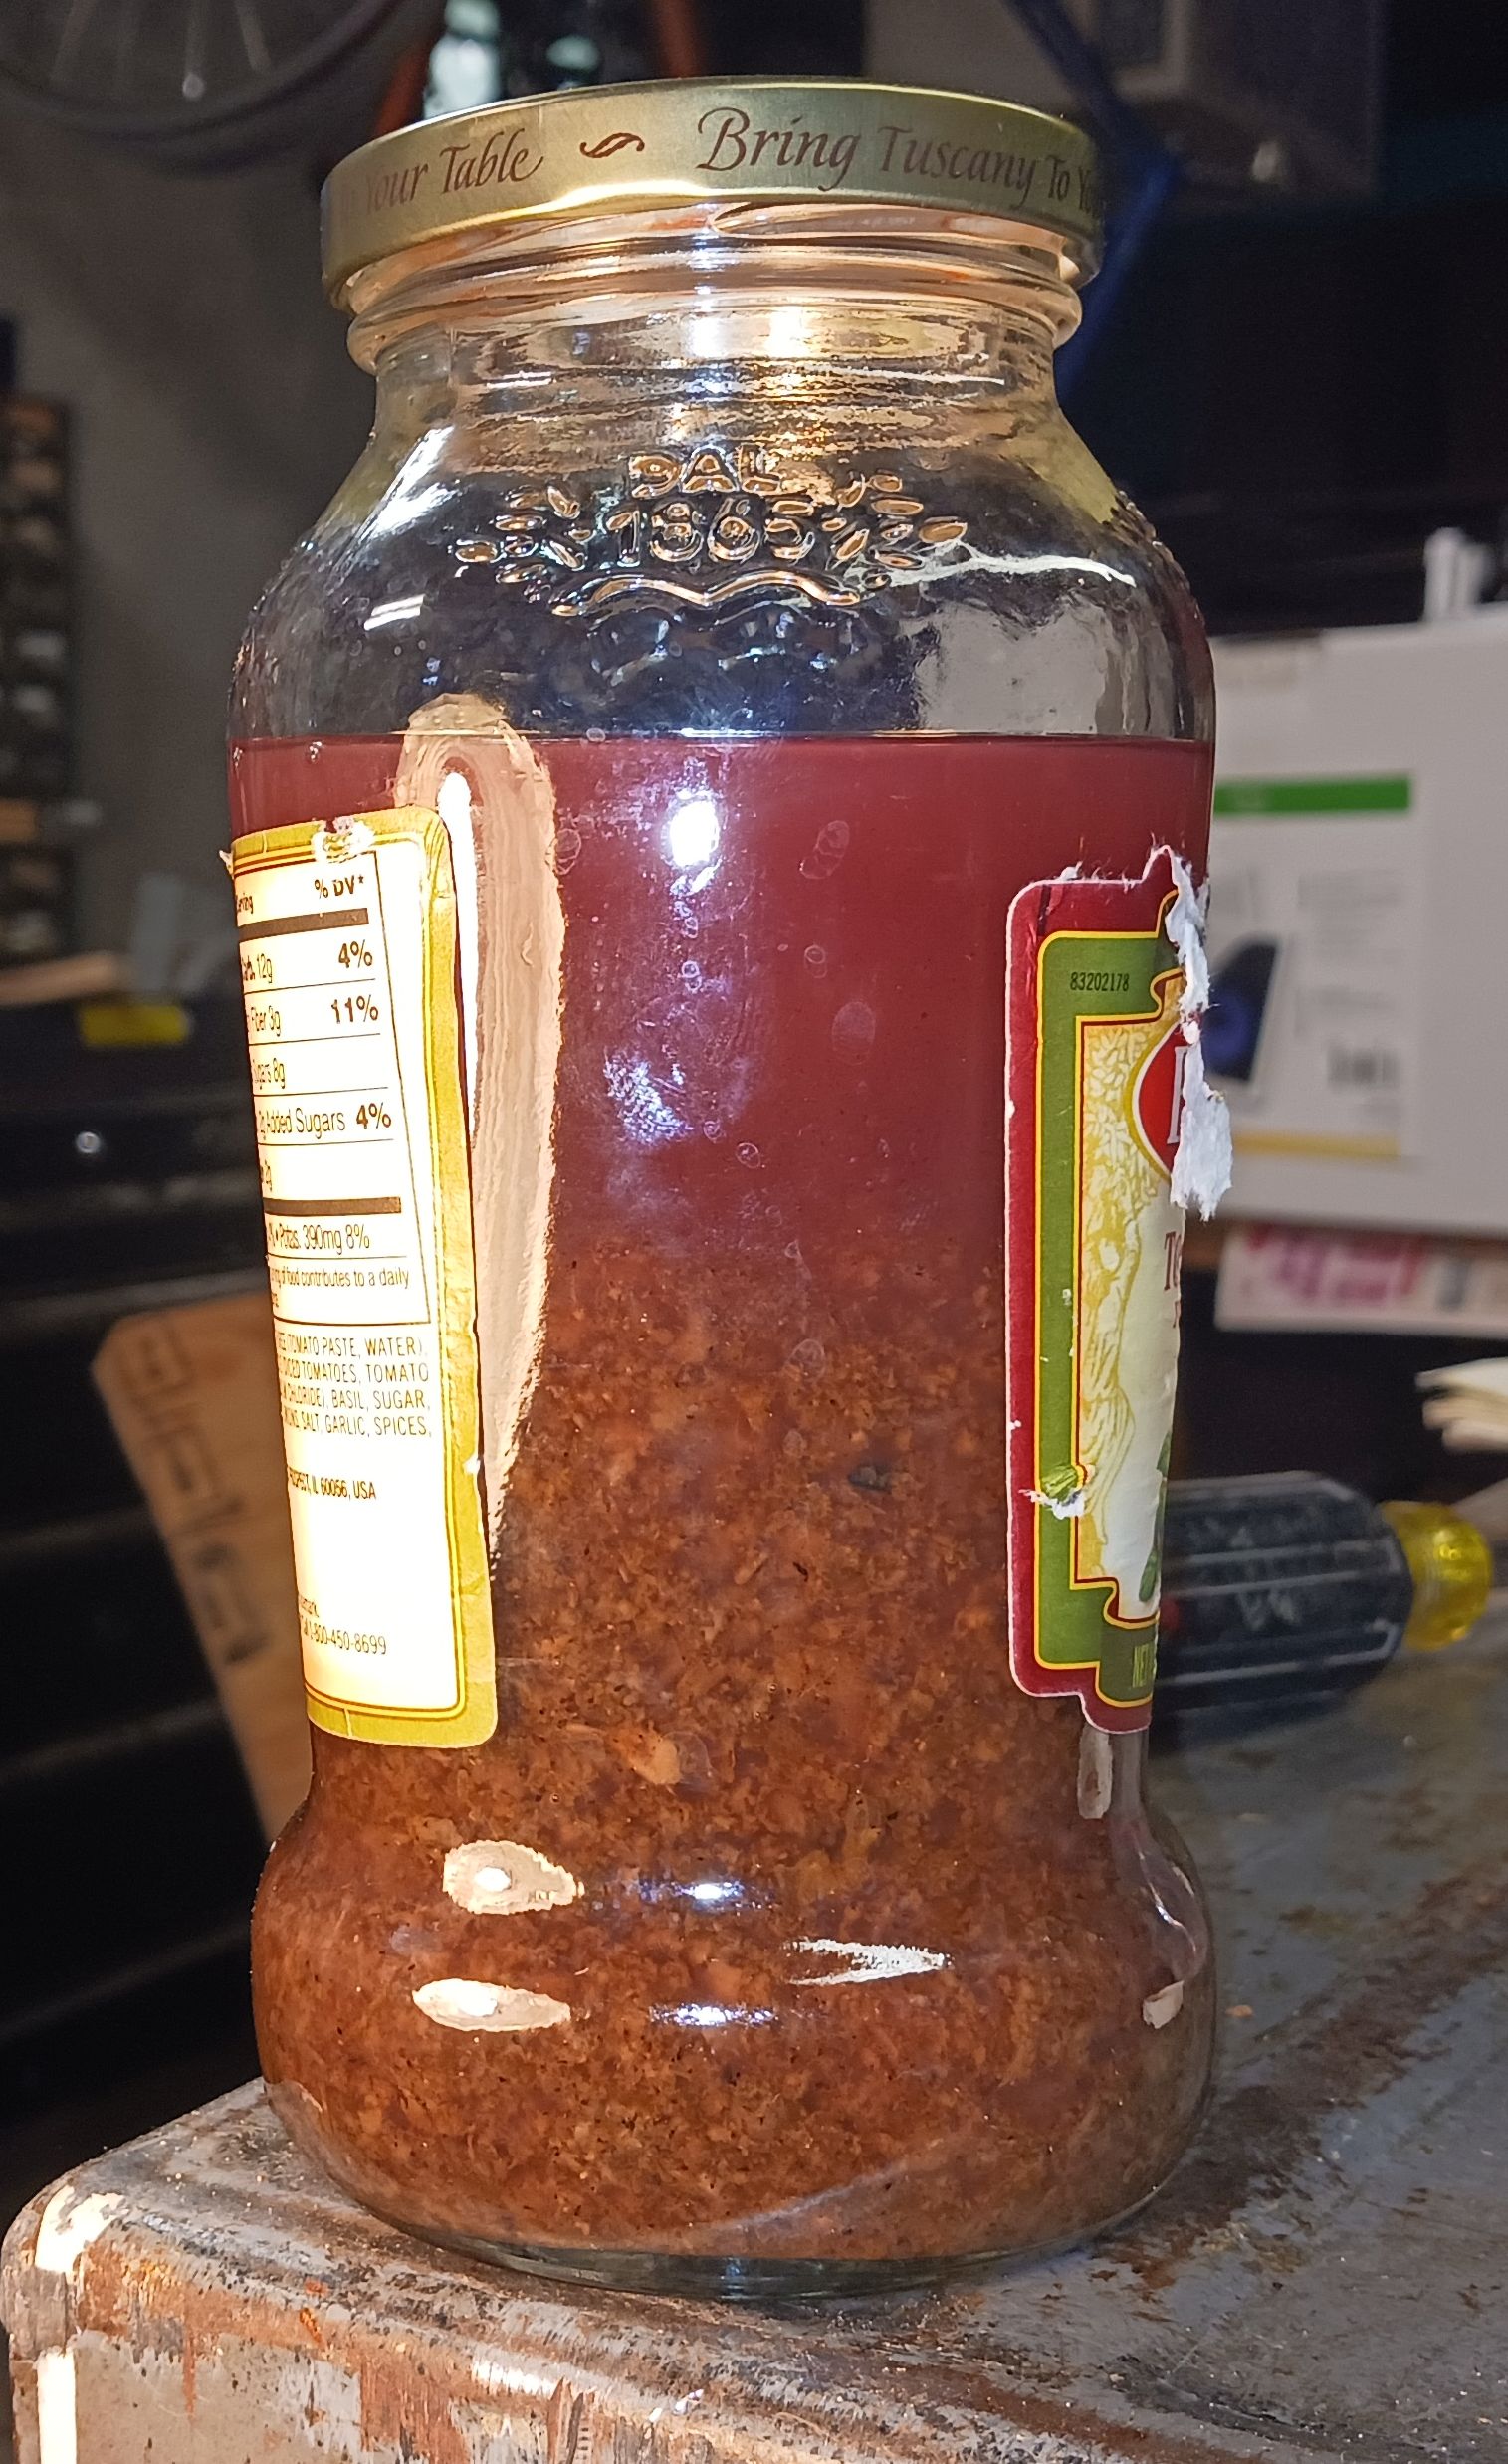
Here is
the crud that this tank cleaning session dredged up, about 12oz
in a 24oz jar.Pretty nasty.